External EPICS Reference Links
- Web interface to EPICS archiver
- EPICS 3-14 reference
- Matlab LabCA interface
- Python to EPICS modules: pyepics and pcaspy
What is an EPICS record?
EPICS is both a database for storing machine parameters, and an interface to the machine's hardware. Regardless of whether you are interacting with a number that represents a beam position, or a number that is the command value for a magnet, the way you interact with them is the same-- getting or setting an epics record, also called an EPICS Process Variable (PV). In order to get or set the PV, all you need to know is its name.Structure of an EPICS name
Full name = PREFIX_parameter The PREFIX is chosen to identify the accelerator component, and has its own structure.- Format: TSSCCCNN
- T = Technical System
- SS = Sector or Sub-system
- CCC = Component Type (must be unique, no overloading)
- NN = Instance Number within Sector or Subsystem Signal_name
- All element names will use 8 characters
- All characters will be upper case
M = This is a magnet S1 = This is in the S1 splitter section QUA = This is a quadrupole 01 = This is the first of this type in this section The parameter can be named anything, and depends on what type of element it is a part of, but there are a few common examples
- command values typically use "cmd"
- readbacks typically use "rdbk"
Getting/Setting a record
We have many different ways to interact with EPICS records, and we will start with the most basic methods, and proceed from there. From the EPICS Terminal As an example, let's get the command current in the first injector solenoid, with EPICS prefix MA1SLA01: From the linux terminal on an "ERP" computerType: caget MA1SLA01_cmd Response: MA1SLA01_cmd -3.15To set or "put" the value, use the following command.
Type:     caput MA1SLA01_cmd -3.20
Response: Old : MA1SLA01_cmd                     -3.15
          New : MA1SLA01_cmd                     -3.20
From an EDM screen
EDM has an entire section below, please see there for more details.
From Matlab
The most basic interface to EPICS is via the labca package, which is in the default Matlab path on the erpopr account. The syntax is nearly identical to the terminal command above.
Type:    lcaGet('MA1SLA01_cmd')
Response: -3.15
To set or "put" the value, use the following command:
Type:   lcaPut('MA1SLA01_cmd', -3.2)
(no response when putting)
We have also written some helper functions to help in writing Matlab scripts to control the accelerator. In the directory /nfs/erl/online/ops/matlab_scripts/utilities/epics/ are a set of functions that can make this process easier. Please open the individual files for more detailed documentation. - get_data_from_prefix.m : Supplying only the element name (e.g. 'MA1SLA01') returns a structure containing the current values of all PVs associated with this element. Also naturally averages data, assembles many elements into one data structure, and can easily interact with the virtual machine.
- set_cmd_from_prefix.m : Sets an elements primary command value using only the element name.
- get_prefix_from_area.m : Returns a structure of all elements of various types (e.g. quads, dipoles, ...) in a given machine section (e.g. "S1", "A1", ...)
- many others, explained elsewhere
>>> caget('MA1SLA01_cmd')
-3.200000047683716
For setting, use the PV name and value:
>>> caput('MA1SLA01_cmd',-3.2)
1
>>>
The "1" returned here indicates the setting was successful.
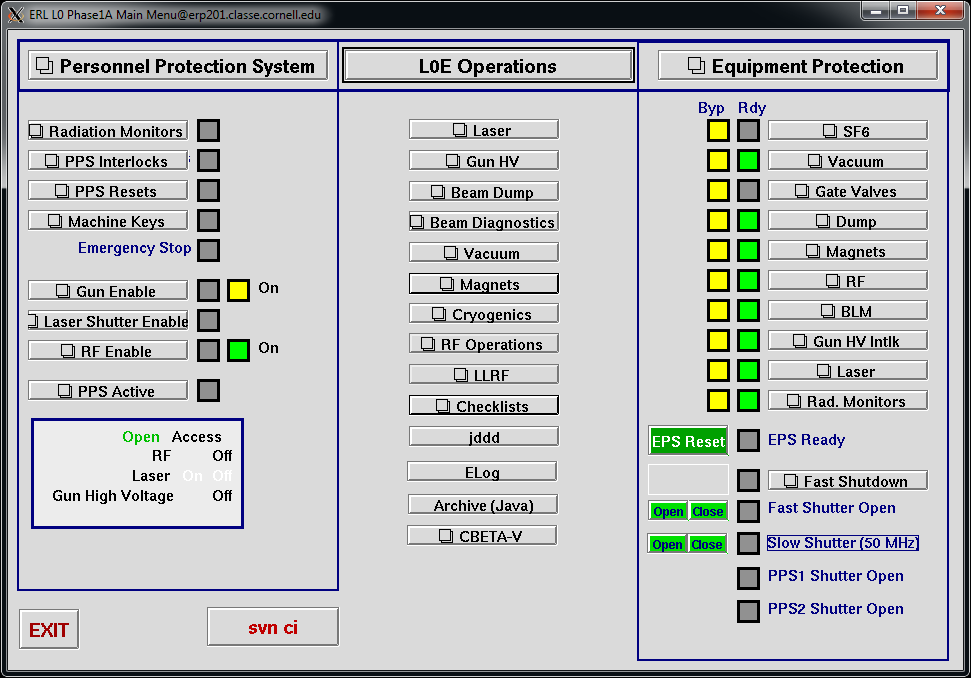
Using EDM
EDM, or EPICS Data Manager, is our primary GUI to control the accelerator. To start it, please run the following script, located in the erpopr home directory:erpopr@erp121 $ ./l0_screens.sh &Then you will see the following screen:
 The three columns of this screen are:
 - Personnel Protection System : Readbacks of things associated with the PPS. When all is lit, radiation producing equipment can be turned on (but not necessarily beam).
- L0E Operations : A categorical list of GUIs to interact with different areas of the machine, both controls and diagnostics.
- Equipment Protection : Readbacks of the status of various equipment, as far as it impacts the ability of the machine to operate. Beam can only be made when all of these are lit.
- Left-click on "Magnets" in the middle column.
- Select "A1, A2, A3 Gun - ICM" from the popup menu.
- The following screens appears
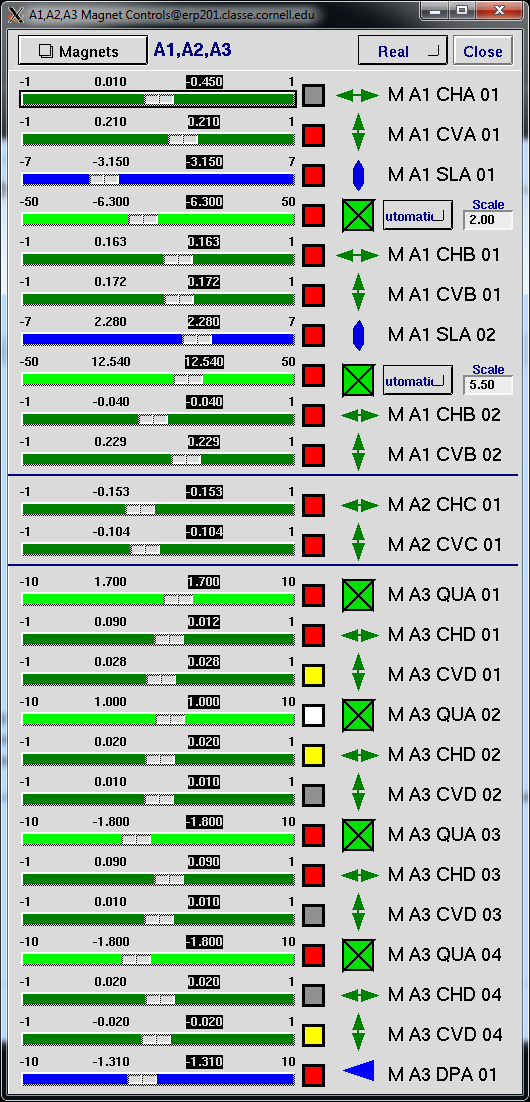
 From this screen you can directly control the magnets in the A1, A2, and A3 sections. Importantly, look at the structure of the interface to a single magnet.
- M A1 SLA 01 : This is the EPICS element name of the solenoid
- The numbers : -7, -3.150, -3.150, 7, are respectively:
- -7 : The lower operating limit of the magnet current
- -3.150 (black letters, grey background) : The current setpoint
- -3.150 (grey letters, black background) : The "quick" save value of the setpoint. You can restore from the slider value to this value by mousing over the slider and typing "Shift" + "r" (restore), or save a new value to the quick save by "Shift" + "s".
- 7 : The upper operating limit of the magnet current
- The grey on blue slider control : There are multiple ways to interact with it
- Left-clicking will move up or down by a single step
- Putting the mouse over the slider, then pressing the left or right keyboard arrow keys will also move up or down a single step
- Right-clicking will bring up a menu to type in things like the current step and the command value directly
- Middle-clicking will copy the name of the command record into the copy/paste buffer. This is very useful! For example, it can be used to paste the record into the archiver.
- The (as shown) red box : This box is red when the command and readback differ by a significant amount. It is green otherwise.
- The blue vaguely oval shape : A shape chosen to make it easy to tell this is a solenoid. All types of magnets have a certain shape.


| I | Attachment | Action | Size | Date | Who | Comment |
|---|---|---|---|---|---|---|
| |
12b0457f986f21531619ae6a175808ea.png | manage | 56 K | 05 Sep 2018 - 13:38 | AdamBartnik | Auto-attached by ImagePlugin |
| |
2afb7c9279aa9ac4eb8d5a9b08453dea.png | manage | 45 K | 05 Sep 2018 - 13:38 | AdamBartnik | Auto-attached by ImagePlugin |
| |
d6a1b285728626df94b23047e86faa73.png | manage | 1 K | 05 Sep 2018 - 13:38 | AdamBartnik | Auto-attached by ImagePlugin |
This topic: CBETA > WebHome > CBETA-Beam-Commisioning > EpicsBasics
Topic revision: 04 Apr 2019, cg248
Topic revision: 04 Apr 2019, cg248
Ideas, requests, problems regarding CLASSE Wiki? Send feedback