The simGUI interface to GPT
 simGUI is the result of many years of development towards a user-friendly GUI to interact with GPT and other (Astra, BMAD...) simulations. Here are a few of its features.
 - Written in Matlab (location: /nfs/erl/online/ops/matlab_scripts/simGUI/simGUI.m)
- Layout (button position, behavior, ...) is completely configurable via a set of input files.
- With minimal work, it can be modified to run new simulations and/or make new kids of plots and data analysis.
- Can load settings from EPICS
Turning on simGUI
From a linux terminal logged in as erpopr, type 'simGUI' at the console. This starts a terminal-based Matlab and then runs the script. The simulation will start up, and will load whatever simulation and layout was the last one used.Loading a GPT Layout (i.e. lattice)
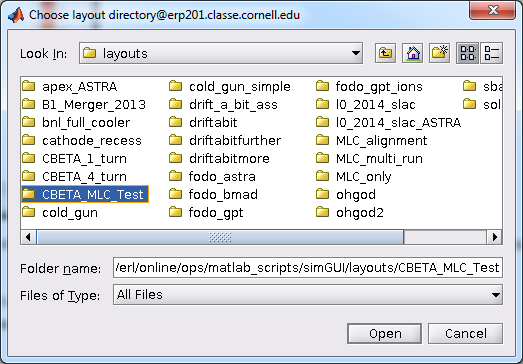
simGUI automatically loads the last layout that was used, but if somehow it loads the wrong one, then you can manually choose via the following steps.- From the File menu, choose "Select Layout Directory"
- Choose "CBETA_MLC_Test"
-

- After selecting the directory, then choose Open.
Choosing Simulation Options (Optics, GPT parameters, Initial Distribution, etc.)
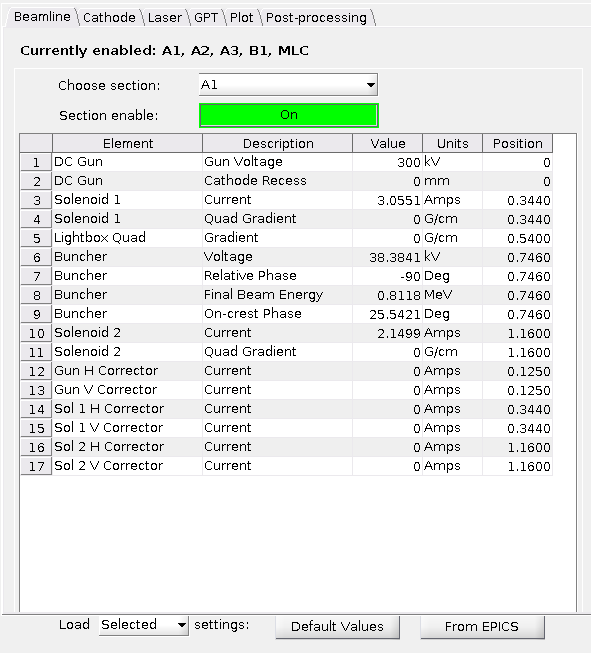
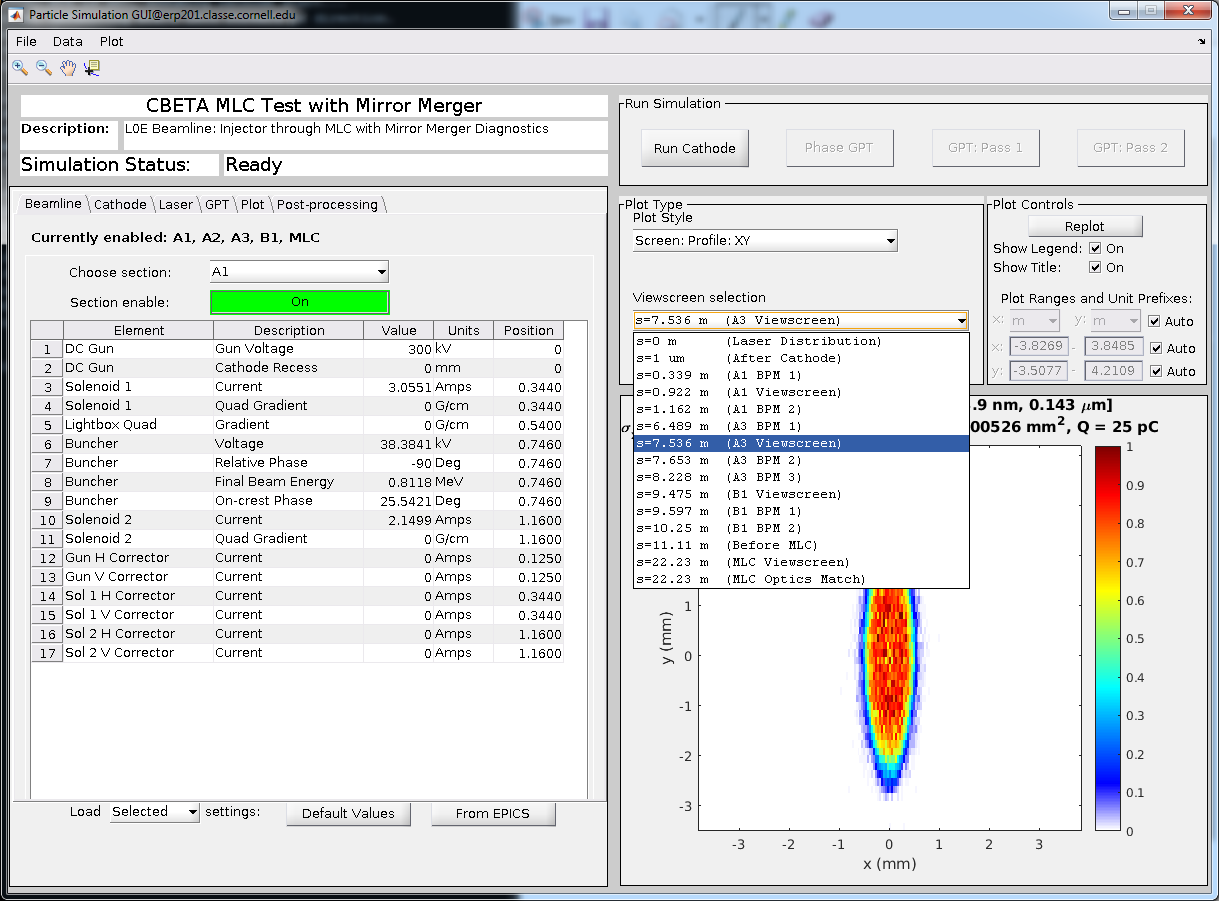
The left side of the window contains all of the settings in various tabs. The tabs are determined by input files, and can vary on which layout you have loaded, but for CBETA the following tabs should exist. Beamline Tab
- Here you can select machine sections (A1, A2, etc..), and see all of their optics settings within a table
- Section Enable: allows you to turn off all elements in a machine section easily
- Note: The beam will only be simulated up to the last enabled section
- The table tells you the element name, a short description, a value, its units, and the element position
- Value: This is the only editable column. Changing these values is how one interacts with the simulation
- At the bottom of the screen, one can push two buttons to do the following:
- Load (selected / all) settings to Default Values: Return the setting to the lattice default
- Load (selected / all) settings to From EPICS: Get the current state from the machine
- If "Selected" is chosen, then on the highlighted table lines (by clicking them) will be loaded

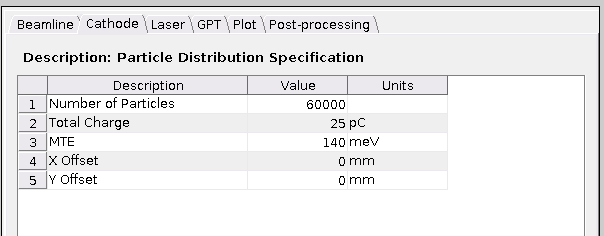
- Number of particles : Number of macroparticles in the GPT simulation
- Total charge : Total bunch charge, only relevant if a space charge simulation is enabled on the GPT tab
- MTE : Mean transverse energy of the cathode, a property of the cathode material, laser wavelength, and temperature of the cathode
- X/Y Offset: An offset to the centroid of the initial laser position on the cathode

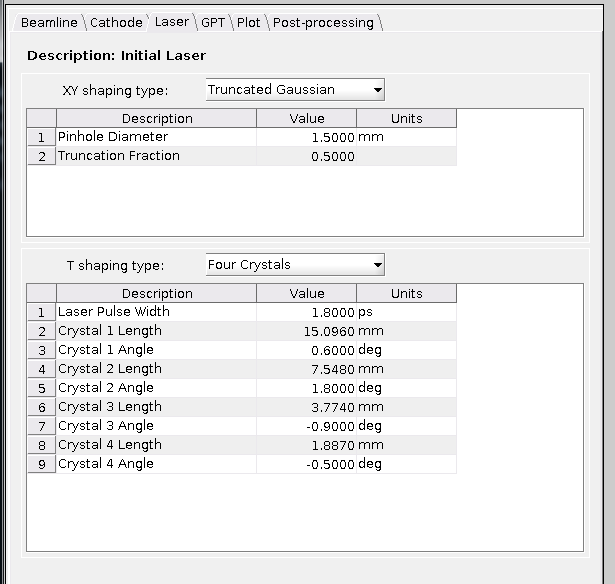
- XY Shaping Type : "Truncated Gaussian", "Deformable", "2D distribution file", ...
- Lets you choose the transverse distribution of the laser.
- Typically, we use "truncated gaussian" for an ideal laser, or "2D distribution file" to load measured data
- T Shaping Type : "N Crystals", "Deformable", "Gaussian", ...
- Lets you choose the longitudinal distribution of the laser.
- Typically, we use "4 Crystals", since that is what is used in the CBETA laser.

- Many of the settings on the top are not commonly used, and won't be described here
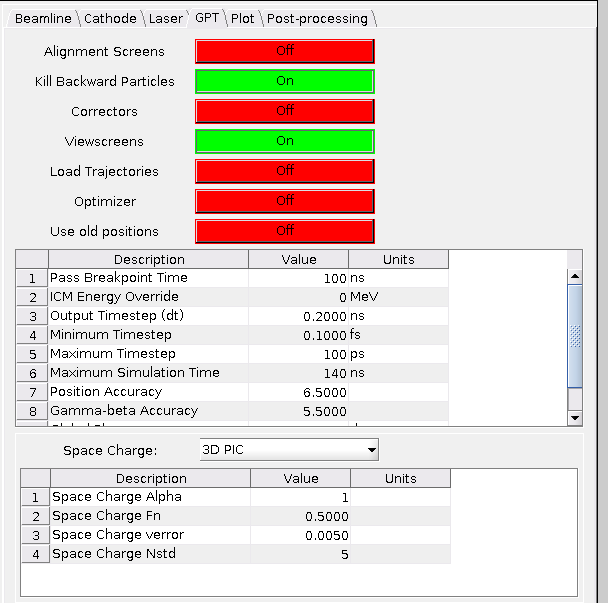
- Pass Breakpoint Time : It can be useful to stop the simulation at a given time, and then restart it after that. This allows one to change settings later in the lattice, and not have to simulate up to that point again.
- 21.6 ns = After ICM, 0.6 ns = after Gun, 100 ns = after entire simulation
- Position, Gamma-beta Accuracy : Number of digits of precision to expect from the Runge-Kutta calculation
- Space Charge : Can be set to "Off", "3D PIC", "3D Tree-code"
- Typical settings are "Off" for no space charge and "3D PIC" for the usual space charge algorithm
- "3D Tree-code" should be used with care, as it can be tricky to choose settings properly

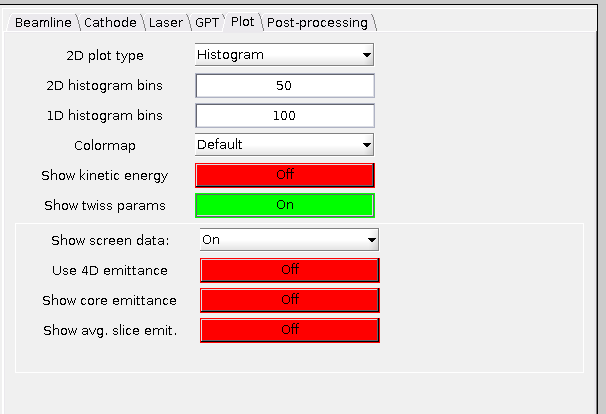
- 2D plot type : Histogram or Scatter. Scatter can be useful because it colors the points by arrival time
- (1D/2D) Histogram bins : How many bins to have in plots that produce 1D or 2D histograms
- Show screen data : Whether to add points on the line plots at the locations of viewscreens
- Note: screen data can disagree slightly with the line data because one is taken at a given position, and the other at a given time
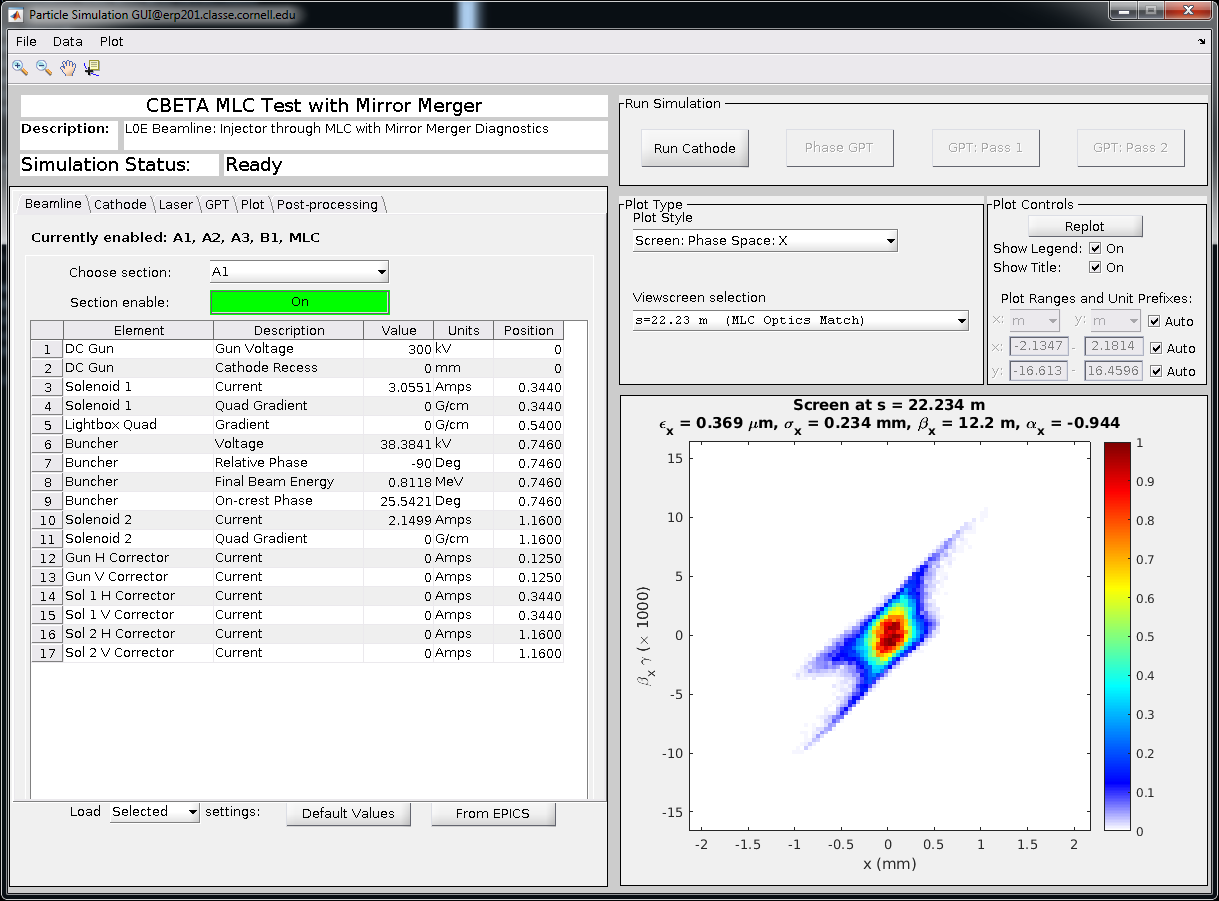
Run Simulation Buttons
 In the upper right corner of the simGUI window are the buttons that trigger actual GPT calculations to be done. Depending on what settings you have changed, some of the buttons will be greyed out to try to prevent the user from running the simulations in the wrong order. For example, if a cathode or laser distribution setting is changed, then the GPT simulations will be greyed out until the cathode simulation is run again.
 - Run Cathode : Run Colwyn's "distgen" distribution generator, a stand-alone C++ code that makes the initial particle distribution. It can handle many different types of distributions, from standard functions, to "deformable" distributions that can be used in optimizations, to distributions from files. In all cases, it creates a pseudorandom distribution to help convergence of the beam properties.
- Phase GPT : GPT does not have built in cavity phasing, so this button runs our own python-based phasing script, developed by Adam and Colwyn. It tracks a single particle without space charge through the lattice, one cavity at a time, putting each cavity at the desired phase.
- GPT : Pass 1 : Runs the lattice up to the breakpoint time set in the GPT tab
- GPT : Pass 2 : Runs the lattice after the breakpoint time, using the previous pass 1 output as the initial distribution
Plots
On the lower right side of the simGUI window is the plot controls and outputs. Many pre-defined plots are available of two basic types: line plots over the entire lattice, and "screen" data taken at a single lattice location.
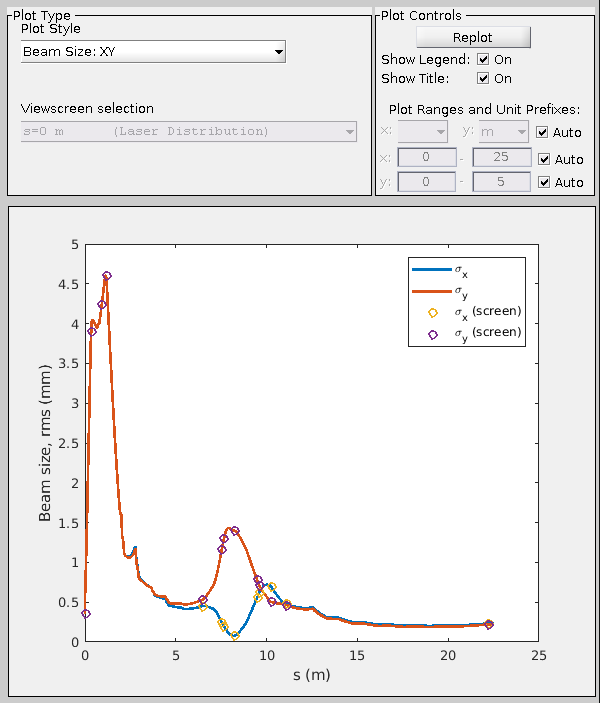
- Plot Style : Pre-defined plots to display. At the top of the list are line plots that present average properties of the beam as a function of lattice s position. At the bottom are "Screen" plots that show particle distributions at a single s position.
- Viewscreen selection : When a "screen" type of plot is selected, then the s position can be chosen here.
-

- Plot Controls : Some basic controls over the axes, title, and legend
-

- Displayed axis units and ranges can be chosen here.
- Perhaps confusingly, the units are chosen by their metric prefix. So, for "millimeters" one would choose "m" = "milli".
- "Auto" will choose both a range and a unit that will make the axes as reasonable as possible
-
Menu Options
- File Menu
- Select Layout Directory : Described above, this is how one selects the GPT lattice (and GUI layout) to use.
- Load/Save Simulation : Save the simulation and all data, so that one can easily load it again later
- Data Menu
- Dump data into workspace : Put the currently plotted data into the Matlab workspace for external analysis
- Output screen in BMAD format : Output the currently shown s-position particle distribution in a format that can be loaded into the CBETA BMAD lattice
- Send to EPICS / EPICS ref : Output the data so that CBETA-V can plot it, allowing comparison to the BMAD virtual machine simulation
- Plot Menu
- Make New Figure : Put the currently shown plot in a new, separate figure. This allows one to more easily save the figure for papers, presentations, etc.


Ideas, requests, problems regarding CLASSE Wiki? Send feedback