You are here: CLASSE Wiki>Computing Web>ClasseVPN (18 Apr 2025, DevinBougie)Edit Attach
CLASSE VPN
*NOTE*: The steps for "Enrolling in Duo" and "VPN Setup" only need to be done once.
Setup and Configuration
You must enroll with CLASSE Duo, even if you already use Duo for Cornell central services.1. Enroll in CLASSE Duo (Required)
This step must be completed before you can install the VPN client and only needs to be done once.
Please see CLASSEDuo for instructions.
2. Install Pritunl VPN Client (personal non-Linux devices only)
CLASSE-managed computers: Pritunl is already installed. Please skip to VPN Setup- Browse to PriTunl to download and install the appropriate client version:
- For Intel macs, download macOS Intel (Click on the green "Download Intel Pkg")
- For M1 Macs, download macOS Apple Silicon (Click on the green "Download ARM Pkg")
- For Windows, download the Windows install (Click on the green "Download Installer")
3. VPN Setup
You must complete the Enroll in CLASSE Duo steps above before proceeding.Log in to Pritunl WebUI
- Browse to https://vpn.classe.cornell.edu/login
- Log in with your CLASSE username.
- Complete the Duo two-step authentication. You will receive a request titled "Key: CLASSE VPN". The request will expire after 60 seconds.
- If you have multiple devices registered in Duo, Pritunl will not prompt for the device to use--it will try the first device in Duo device management. If that device is a phone, the login may timeout before it tries the second device. Connecting to Pritunl you should plan on having your first listed device nearby.
- Device order can be rearranged in the Duo device manager.
Configure CLASSE VPN Profile
- Copy the "Profile URI Link:" from VPN webpage
- Start Pritunl on your computer.
- Click on "Import Profile URI".
- Paste the "Profile URI Link:" that you copied above.
- Click on "Import".
- If you get an error message that says "Failed to load profile uri (Not Found)", then your temporary profile has timed out.
Start over again at https://vpn.classe.cornell.edu/login
- If you get an error message that says "Failed to load profile uri (Not Found)", then your temporary profile has timed out.
4. Connecting to the CLASSE VPN
- Start the Pritunl app.
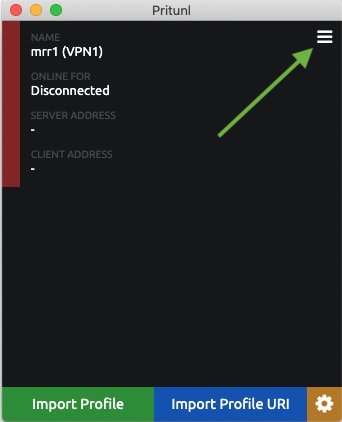
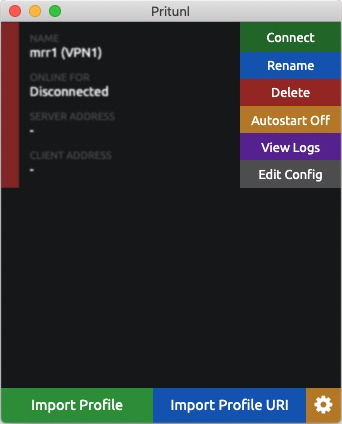
- Click on the hamburger button (the three horizontal lines) next to your new profile and choose “Connect”


- Enter your CLASSE password.
- Complete the Duo two-step authentication. (You will receive a request titled "CLASSE VPN". The request will expire after 60 seconds.)
Pritunl Client Config
- Beneath the "Connect" button for your VPN connection in Pritunl, you may notice an "Autostart Off" setting. We recommend leaving this off (the default), to avoid spurious Duo prompts.
Linux VPN Configuration
For Linux, we recommend using Network Manager.VPN Setup (Linux)
- Install the "NetworkManager", "NetworkManager-openvpn","NetworkManager-openvpn-gnome", and "network-manager-applet" packages for your distribution.
- Browse to https://vpn.classe.cornell.edu/login
- Login with your CLASSE Userid
- Complete the Duo two-step athenticaion. (you will receive a request titled "Key: CLASSE VPN". The request will expire after 60 seconds)
- Click on "Download Profiles (zip)"
- Unzip the zip file downloaded above.
- Edit the .ovpn file unzipped above, and change line 46 to:
remote 128.84.44.59 1194 tcp
- open a terminal, and type
nmcli connection import type openvpn file CLASSE_profileName_VPN1.ovpn
(replacing "CLASSE_profileName_VPN1.ovpn" with the name of your .ovpn file).
Connecting to the CLASSE VPN
- Click on the "Networking" icon in the upper-right corner of your screen.

- Mouse-over "VPN Connections" and click on the "CLASSE_" VPN connection you created above to connect or disconnect from the CLASSE VPN.
Troubleshooting
- If you find network manager timing out before completing the connection, try increasing the
vpn.timeoutsetting. - If you find you are unable to make connections outside of CLASSE after connecting to our VPN, check "Use this connection only for resources on its network" in the GUI. Alternatively, open a terminal window and type the following commands (replacing "$name" with the name of your VPN connection, as seen using "nmcli con"):
nmcli connection modify $name ipv4.never-default true
nmcli connection modify $name ipv6.never-default true
Edit | Attach | Print version | History: r51 < r50 < r49 < r48 | Backlinks | View wiki text | Edit wiki text | More topic actions
Topic revision: r51 - 18 Apr 2025, DevinBougie
Quick Links
Usage Information
Collaboration
IT Communications
 Copyright © by the contributing authors. All material on this collaboration platform is the property of the contributing authors.
 Ideas, requests, problems regarding CLASSE Wiki? Send feedback


