You are here: CLASSE Wiki>Computing Web>PrintingFromMacOSX (28 May 2025, MichaelRoman)Edit Attach
Printing from Mac OS X
This page contains instructions for printing from Mac OS X. Printing from a Macintosh is the same whether you are using a desktop machine on our Public subnet or a laptop on our Protected subnet. If your laptop is on RedRover, see the CLASSE VPN section below. If you are certain you have up-to-date PPDs, skip ahead to Adding your printer
CLASSE VPN
If your computer is connected to RedRover, eduroam or any other non-CLASSE network, you must first connect to the CLASSE VPN.If your computer is on ZeroTier, it is on a CLASSE network - run checkZT (located in /Applications) to check this.
Adding your printer
- Select the 2nd item down in the black Apple menu in the upper left of your screen to launch System Settings
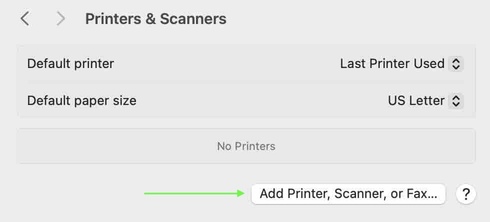
- Click on Printers & Scanners, toward the bottom of the left hand pane
- Click on the Add Printer, Scanner, or Fax... in the lower right

see CLASSE Printers List for supported printer features(paper sizes, duplex, color, etc)
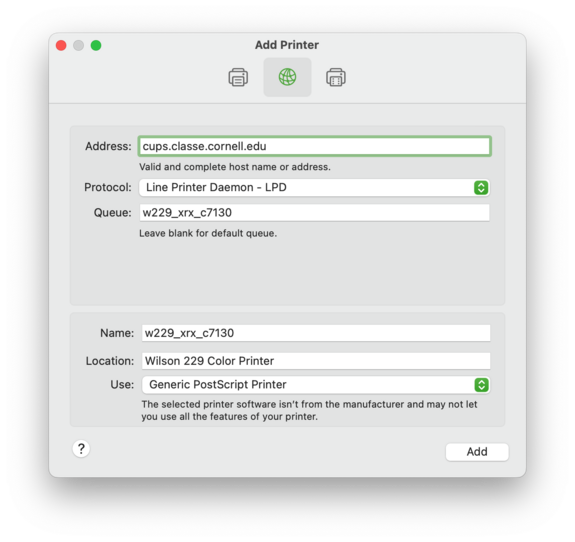
- The add printer window will appear...click on the IP icon (middle icon at the top)

- for Address: Enter cups.classe.cornell.edu for LPR Printer's Address.
- for Protocol: make sure Line Printer Daemon - LPD is selected (not "Internet Printing Protocol - IPP," etc.)
- for Queue: Enter the Printer name for the printer you would like installed. Please refer to our PrinterList for the correct name.
- for Name: Enter a description that will mean something to you (eg, the same thing you entered for Queue)
- for Location: Enter the room location of the printer, e.g. W229
- for Use: Select Generic PostScript Printer (preferred)
Edit | Attach | Print version | History: r19 < r18 < r17 < r16 | Backlinks | View wiki text | Edit wiki text | More topic actions
Topic revision: r19 - 28 May 2025, MichaelRoman
Quick Links
Usage Information
Collaboration
IT Communications
 Copyright © by the contributing authors. All material on this collaboration platform is the property of the contributing authors.
 Ideas, requests, problems regarding CLASSE Wiki? Send feedback
