You are here: CLASSE Wiki>Computing Web>PrintingFromWinTwoKDesktop (07 May 2013, DevinBougie)Edit Attach
Printing from Legacy Windows XP LNSNTCAD Domain Desktop or Laptop
If you're running a Windows 7 or CLASSE Domain Windows XP system, see: CLASSE Domain Printing Adding a printer or even finding the list of printers, is often confusing to many users. Here are the step-by-step instructions of how to locate the printers available to you and how to add one to the list of printers on your computer.If you are still experiencing difficulty after trying these instructions, please contact our mailto:service+cmpgroup_website@lns.cornell.edu?subject=Printer%20Page Service Group Coordinator. Please refer to our List of Printers for information on printer names, locations, and properties. Please see our general Printing page for information on printing from non-domain member laptops.
Windows
- First, find out the Printer name. You can find this out from the label on the front of the printer. It will be something like {First letter of Building}{Room Number}_{Vendor}_{Model Number}. Example:W229_IBM_1567
- Find out where they are served from. PC221 is the default.
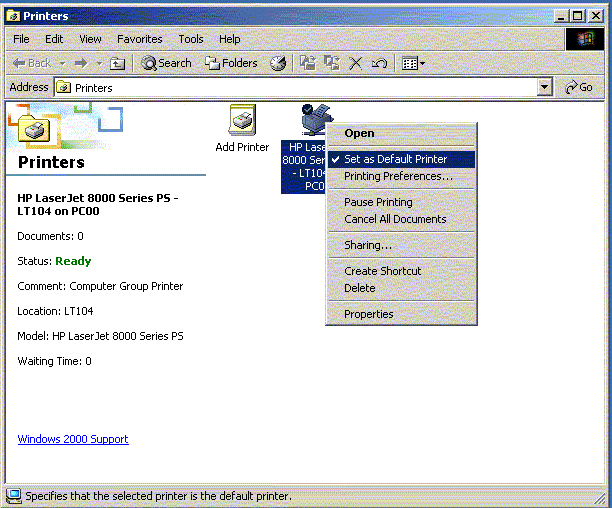
- Go to Start - Settings - Printers
- In the Printer window you will see the printers you have to choose form. If there are none listed or if the one you are looking for is not there, Double Click - Add Printer icon
- The "Add Printer Wizard" window will appear. Click - Next
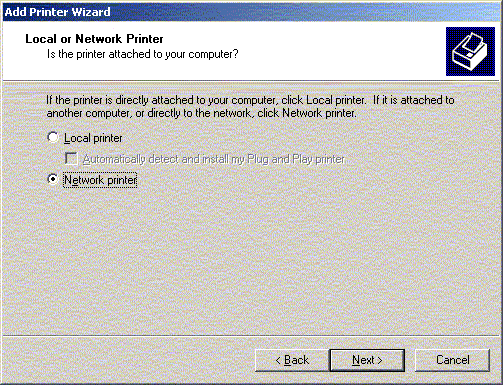
- The "Local or Network Printer" window will appear. Choose the Network Printers Radio Button and click Next

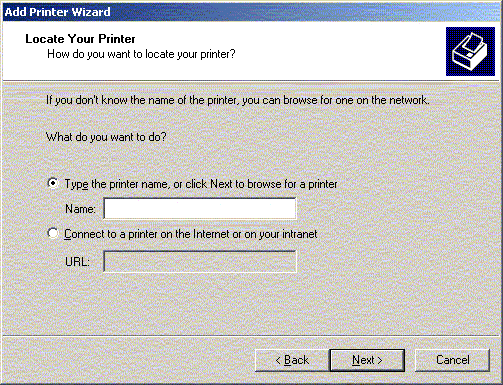
- The "Locate you Printer" window will appear. Verify that the radio button next to, "Type your Printer name or click Next to browse for a printer", is checked.

- Enter in the path to the printer as \\PC221\{printer name}. Example \\PC221\W229_IBM_1567. Once you type in \\PC221\ a dropdown will appear listing all printers if you don't remember the specific name. Once you've typed in a printer name or chosen from the drop-down, Click - Next
- The "Default Printer" window will appear. Click the Radio Button next to, "Do you want your windows-based programs to use this as your default printer? If you do not wish this, Check the "NO" Radio Button. Click - Next
- The "Completing the Add Printer Wizard" window will appear. Click - Next
- Right click on a printer icon in the list.
- Click on "Set as Default Printer"

Edit | Attach | Print version | History: r6 < r5 < r4 < r3 | Backlinks | View wiki text | Edit wiki text | More topic actions
Topic revision: r6 - 07 May 2013, DevinBougie
Quick Links
Usage Information
Collaboration
IT Communications
 Copyright © by the contributing authors. All material on this collaboration platform is the property of the contributing authors.
 Ideas, requests, problems regarding CLASSE Wiki? Send feedback
