You are here: CLASSE Wiki>Computing Web>CmpgrpLinks>RunningIdentityFinder9 (06 Jun 2019, WernerSun)Edit Attach
Data Cleanup for Windows and MacOS using Identity Finder v9
For information about scanning Linux computers and PowerPC based Macs, see Running Find-SSNs to find confidential data. Identity Finder runs only on Intel based Macs and Windows computers. Each of us is personally responsible for locating and removing any confidential data from any computer directory that we can write to. In some cases, automated tools can be used to help find such data. (See below.) If automated tools are inadequate or unavailable, files must be verified manually to contain no confidential data. For more information about where you should be keeping your files, see CLASSE's Data Stewardship information. For more information about Cornell's Data Cleanup and Inventory requirement, please see http://datacleanup.cornell.edu/ Cornell Policy 5.10 spells out how confidential data must be protected or eliminated. Although using Identity Finder to help find confidential data is one of the requirements for meeting the goals of Cornell Policy 5.10, Identity Finder cannot find everything. You personally are responsible for eliminating all confidential data in all of your files:- Social Security Numbers
- Credit Card Numbers
- Bank Account Numbers
- Drivers License Numbers
- Protected health information, as defined in the Health Insurance Portability and Accountability Act (HIPAA)
- Data Cleanup for Windows and MacOS using Identity Finder v9
- Windows Identify Finder v9, Step-by-Step
- Using Identity Finder for Mac OS X
- Acknowledgment
Windows Identify Finder v9, Step-by-Step
Notes
- If you need to use Identity Finder and it is not already available on your computer, please contact the CLASSE IT group by submitting a ServiceRequest. Please do not waste your time trying to install or update Identity Finder yourself. The installation procedure needs access to protected files.
- The user interface of Identity Finder v9 is almost identical to the GUI of previous versions. The major differences are its color scheme and which options are enabled by default.
Instructions
Below is a walkthrough of using the Windows version of Identity Finder to scan a hard drive for confidential data. Please read through this document completely before using the software. The Mac version of Identity Finder has the same functionality, although its screens look somewhat different.I. Empty Browser Cookies and Cache
In order to reduce the amount of time spent handling the results, we recommend that you delete browser caches before running identity Finder. CLASSE supports Firefox for most Web browser activities. However, a few specific Cornell and government sites require Microsoft's Internet Explorer. IE11 is installed on most CLASSE Windows computers.- How to clear the cache of IE version 7 or 8 (not installed on most CLASSE computers)
- Open Internet Explorer
- Click the Tools drop-down in the upper right (its icon looks like a gear-wheel)
- Click the Delete Browsing History . If this option does not exist, click the Safety drop-down in the upper right instead of Tools
- If given the option, verify that Temporary Internet Files , Cookies , and Form data are selected
- Depending on the version, click Delete Files or Delete
- Click Close
- How to clear the cache of IE version 9 or 11 (IE9 is no longer installed on most CLASSE Windows computers):
- Open Internet Explorer
- Click the Tools icon at the upper right (its icon looks like a gear-wheel)
- Click on "Internet Options"
- In the in the new window's "General" tab's "Browsing History" section, click on the "Delete..." button
- In the new window "Delete Browsing History", make sure "Temporary Internet Files", "Cookies" , and "Form data" are checked. Check others if you want.
- Click the button "Delete"
- Click "OK" in the window "Internet Options"
- Close IE
- How to clear the cache of Firefox ESR (the standard CLASSE browser)
- Open Firefox
- Select the Tools -> Options... menu item (e.g. click on the Tools menu at the top left. Then click on Options)
- In the new "Options" window, select the Privacy menu option
- Select the link "clear your recent history".
- In the new "Clear All History" window, in the drop-down menu for "Time range to clear", select "Everything"
- If you see an arrow next to the word Details click that
- Place a check in the box next to Cache. Others are optional.
- Select "Clear Now"
II. Start Identity Finder
- Set and document your password for Identity Finder
The very first time Identity Finder is started, a password must be created. It is important to document this password, as it is used to start Identity Finder in the future, to open saved scans, and to protect confidential data. The CLASSE computer group cannot recover this password for you. - Select "Use Advanced Interface" (rightmost of three large icons)
The other interfaces won't let you set your search locations.
III. Select Locations to Scan
You must tell Identity Finder where to scan files and e-mail messages. (You might have to do this each time.) By default, Identity Finder does not look in folders used at CLASSE. You must change its Custom Folders settings to select ALL of the directories to which you can write, at least those four and perhaps others. Below is the shortest list for CLASSE. CHESS might have a different list. Be sure to add all of the locations where you put files. Identity Finder automatically searches all of the subdirectories in them. Under Windows 7, at least these directories (folders) must be scanned: (for most people both their linux id and their windows id are the same as their Cornell NetID.)- \\samba\home\<your linux id>
- \\samba\user\<your windows id>
- C:\temp
- C:\Users\<your windows id>
A. Select the Disk Folders to be Scanned
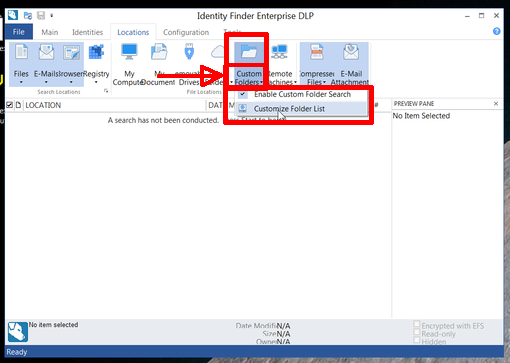
1. select Locations tab:
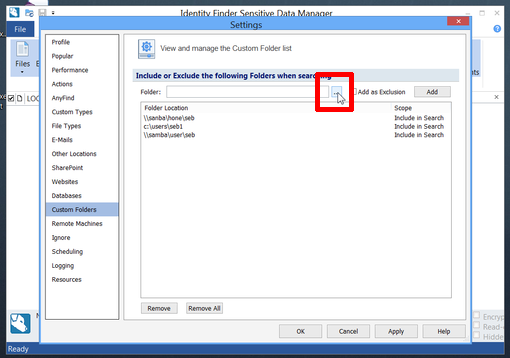
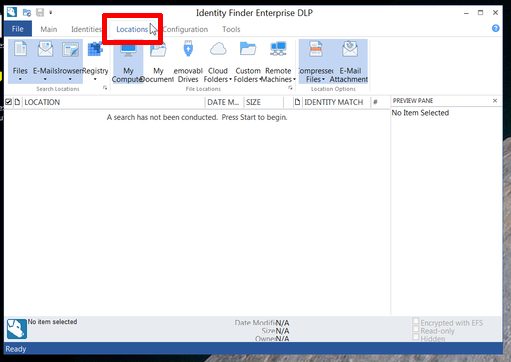 2. select custom files:
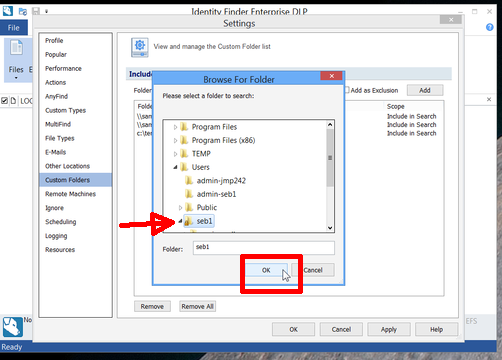
 4B. then select the desired folder, and click on OK:
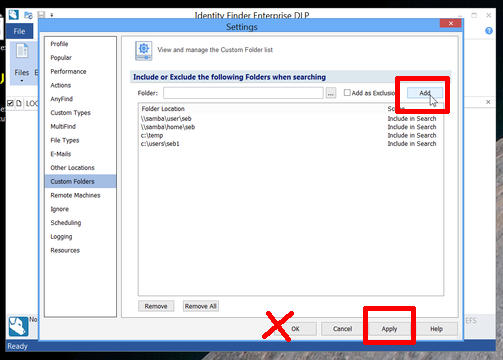
 5. In either case, you should then Add the folder to the list:
 2. select custom files:
 - click lower part of Custom Folders button, (this opens a popup menu. clicking the upper part of the button does not.)
- select (check mark) Enable Custom Folder Search
- then select Customize Folder List
- Repeat the following steps 3 through 5 for each of the folders you need to scan:
- To scan a a \\samba\ share, you must type its name. Browse won't find it.
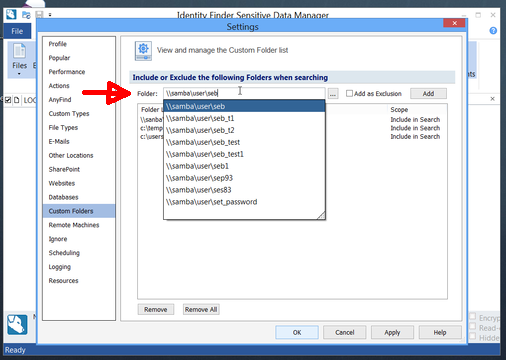
 4B. then select the desired folder, and click on OK:
  5. In either case, you should then Add the folder to the list:
- Repeat steps 3 through 5 for each of the folders you need to scan.
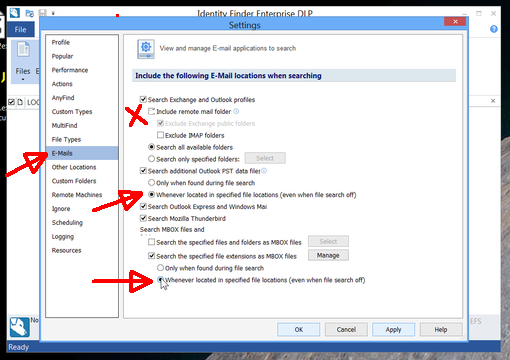
B. Include all Outlook mail folders,
In the "Settings" menu in the left column of the previous location selection window select "E-Mails". Then select "Whenever located in specified file locations", which appears in two places. Verify that "Include remote mail folder" is not selected. Outlook does not support this option.

C. Finally click on OK to finalize the list of folders and E-Mail locations
D. Go back to the main menu
More info is available on Identity Finder's Web site at https://www.identityfinder.com/help/client_win/Searching_Additional_Outlook_PST_Data_Files.htmIV. Select the data types to scan for
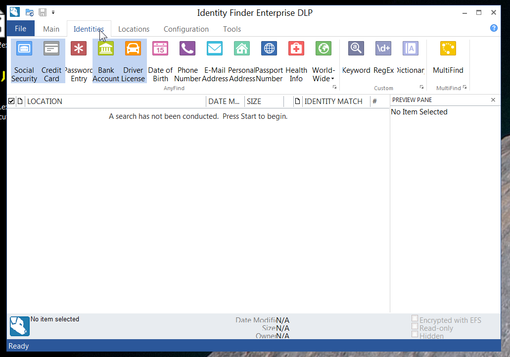
Select appropriate confidential data categories on Identity Finder's "Identities" page.- Select the "Identities" button:
- Select for scanning these Confidential "Identities" :
- Social Security Numbers
- Credit Card Numbers
- Bank Account Numbers
- Drivers License Numbers
Then go back to the Main menu
V. Initiate Scan
On the Main menu, click the button marked "Start" to begin scanning your selected locations.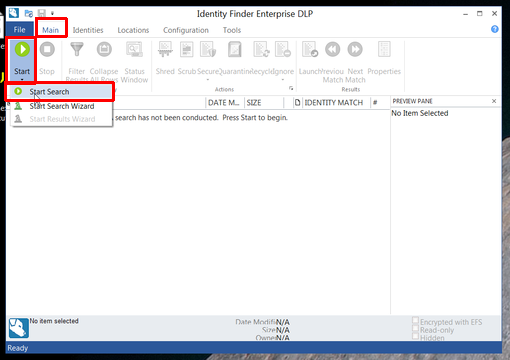 A window similar to this will appear during the scanning process:
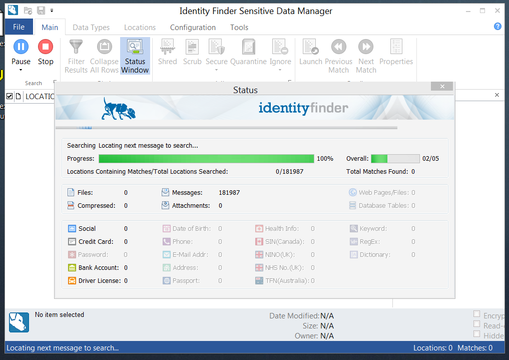 During the scan you might see one or more brief popups from your computer's anti-virus scanner. By defualt, ESET (the AV scanner used by CLASSE) does not scan the contents of Outlook folders since doing so has been known to cause Outlook to lockup. (It does scan messages when you try to open them.) When Identity Finder scans a message which includes a virus, the anti-virus scanner will quarantine or delete any temporary copy created by Identity Finder.
VI. Review Results
When Identity Finder has finished its scan, it will display in its main window a list of locations where it found questionable items. This is where the rest of your Identity Finder session will take place. This is the overall list of documents believed to contain confidential data, both e-mail messages and individual files. More details about the currently selected item are shown in the bottom of the window. Section VII below (Taking Action) explains how to work with emails that have confidential data.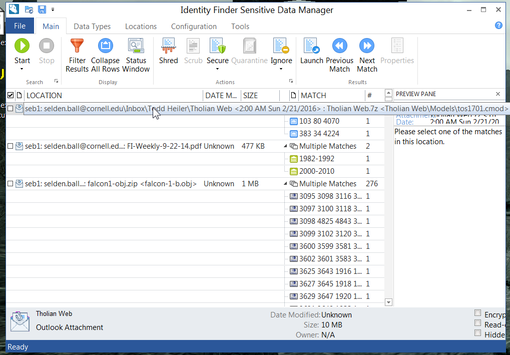 Proceed through the list, one document at a time. Depending on the document type, clicking on an individual "matched" item may show the area of the document where the match was found as shown below. You can use this context to help determine if the data is actually of a confidential nature. To open and view an entire file, doubleclick on it.
VII. Take Action for Confidential Data
Once you've determined if a document actually contains confidential data, you can right-mouse-button click on its name to get a menu of options which can be applied to the file. This "Actions" menu is shown below. You can select multiple documents by clicking the checkbox next to each document.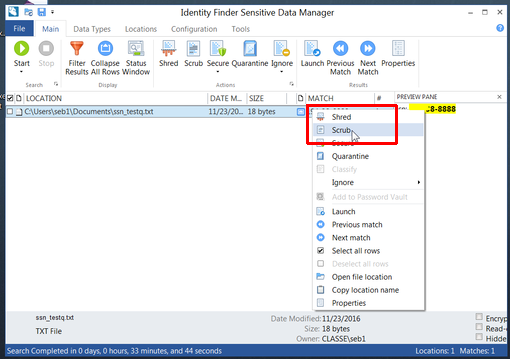 There are corresponding Action buttons in the Main ribbon at the top of Identity Finder, which can be used instead of the popup menu. Each button there has help associated with it. If you "hover" the mouse pointer over a button, help will appear related to that action. Here are some short descriptions of the actions:
- Shred -- Securely deletes files in a manner that prevents anyone from recovering them. *This is the most desirable action for documents that truly contain confidential data. Note * -- CLASSE computer staff cannot recover data which has been shredded unless a backup exists.
- Scrub -- Removes the confidential data from the file and replaces it with X's. Note that this feature only works on certain types of files. If it can't be used, the option will be greyed out.
- Secure -- Do not use . (to comply with Cornell policy with regard to Key Escrow,)
- Quarantine -- Do not use (there is no quarantine server)
- Classify -- Do not use
- Recycle -- Do not use. This moves the file to the recycle bin. Note that this action does NOT delete the file. Even after emptying the recycle bin it is possible to recover these files. Shred must be used instead.
- Ignore
- Select "This Item Location" to denote entire files that are "false positives" (files that Identity Finder misidentifies as containing confidential data but which actually do not.)
- Select "This Match" to denote individual fields which should not be redacted.
Caveats: Email in Identity Finder
Identity Finder can reliably delete (shred) individual messages stored by Outlook. However, if you are using Thunderbird or Eudora, it is critical that you not use Identity Finder to shred mail messages. (Note: CLASSE no longer supports Eudora, and recommends using Outlook (Windows & Mac) or Apple Mail 4 (Mac). Shredding mail messages in Thunderbird or Eudora results in corrupted mailboxes. If confidential data is identified in one or more mail messages, you must delete those messages manually. Identity Finder will show the mailbox where the message was found. Open Thunderbird or Eudora, locate the message and delete it using Thunderbird (or Eudora). Don't use Identity Finder to delete (shred) those messages. This manual deletion will securely delete the mail message. (It is safe to shred messages if you are using Outlook.) If a mailbox gets accidentally corrupted please contact the CLASSE computer group.Using Identity Finder for Mac OS X
I. Before running Identity Finder on a Mac
- You can download the CLASSE distribution HERE: https://www.lepp.cornell.edu/~software/private/software/Identity%20Finder.zip
- CLASSE distributions of Identity Finder for Mac OS X come with a registered copy of the application, a copy of the license file and some instructions
- HIGHLY RECOMMENDED: drag the license file to /Library/Application Support/Identity Finder
- CIT's "How To" page for using Identity Finder on a Mac: http://www.cit.cornell.edu/services/idfinder/howto/mac/index.cfm
II. Running Identity Finder on a Mac
To use Identity Finder for Mac OS X, in the Finder, from the Go menu, choose Applications. In the window that opens, double-click Identity Finder. By default, Identity Finder will only scan your Documents folder. From the Locations menu, you can configure Identity Finder to scan your entire computer, or a custom location. Note: Identity Finder scans can take several hours if you have a large number of documents. If you will be leaving your computer unattended during the scan, you may have to change your Energy Saver settings so your computer will not go to sleep. To scan a custom location:- From the Locations menu, choose Custom... .
- To select a location to scan, click the ellipsis (...), and then browse to the location. Alternately, next to "Folder:", you can enter the location's path.
- Once you have selected a location, click Add. Note: To exclude a location from the scan, follow these steps, but check Add as Exclusion before clicking Add in step 3.
- From the File menu, choose Save or Save As... .
- Give the file a name, and then select a location to save it from the pull-down menu next to "Where:".
- Enter and confirm a password for the file, and then click Save.
Acknowledgment
Many thanks to Dan Elswit of CALS for permission to adapt their walkthrough document for use at CLASSE.- Data Cleanup for Windows and MacOS using Identity Finder v9
- Windows Identify Finder v9, Step-by-Step
- Using Identity Finder for Mac OS X
- Acknowledgment
Edit | Attach | Print version | History: r6 < r5 < r4 < r3 | Backlinks | View wiki text | Edit wiki text | More topic actions
Topic revision: r6 - 06 Jun 2019, WernerSun
Quick Links
Usage Information
Collaboration
IT Communications
 Copyright © by the contributing authors. All material on this collaboration platform is the property of the contributing authors.
 Ideas, requests, problems regarding CLASSE Wiki? Send feedback
