You are here: CLASSE Wiki>Computing Web>NoMachine (05 Nov 2024, MichaelRoman)Edit Attach
NoMachine
For instructions specific to CHESS Remote Operations, please see RemoteUserGuide.Available NoMachine servers and options for new installations.
CLASSE supports four versions of NoMachine. Please submit a ServiceRequest for help selecting or setting up NoMachine for your workstation or desktop.LNX201
LNX201 is available through NoMachine as a general-use remote login node. Any CPU or memory intensive operations should be run on the CLASSE ComputeFarm or on individual workstations - not on lnx201.NoMachine
The default version of NoMachine is available free of charge for the following use case.- Only allows access to your physical display (not virtual desktops or individual applications).
- Must be on a CLASSE Network or connected to the ClasseVPN (only supports the NX protocol, not SSH).
- Only allows one remote connection at a time.
NoMachine Enterprise Desktop
With a license purchase, CLASSE can install the "NoMachine Enterprise Desktop" on your desktop or workstation.- Only allows access to your physical display (not virtual desktops or individual applications).
- Allows multiple simultaneous connections to a single desktop (although the owner of the desktop must be connected to approve the connection requests from other users).
- Does not require you to be on site or connected to the ClasseVPN (supports the ssh protocol, in addition to NX).
NoMachine Workstation
With an additional license, CLASSE can install the "NoMachine Workstation" on your desktop or workstation.- Allows connecting to both the physical display and creating up to four virtual desktops.
- Allows multiple simultaneous connections to a single desktop (although the owner of the desktop must be connected to approve the connection requests from other users).
- Does not require you to be on site or connected to the ClasseVPN (supports the ssh protocol, in addition to NX).
Connecting with a web browser
In addition to using the NoMachine client (see below), you can simply browse to https://nomachine.classe.cornell.edu from any web browser and login using your CLASSE username and password. This is the simplest method to connect, but in some cases we find the NoMachine client to be more responsive and reliable.Connecting with the NoMachine Client
Client Installation
- Download and install the free "NoMachine Enterprise Client" from: https://downloads.nomachine.com/download-enterprise/
Download from the Enterprise Client Products at the BOTTOM of the page
Do NOT download from Enterprise Desktop Products section at the TOP of the page- On a CLASSE-managed Windows computer
- Choose the NoMachine for Windows download link, then choose the 64bit version.
- To complete the installation without admin privileges, please change your installation directory to C:\TEMP\nomachineclient (or any folder under C:\TEMP).
- You should get a shortcut to the NoMachine executable on your desktop.
- The NoMachine app is part of the base image on CLASSE-managed Macs
- On a CLASSE-managed Windows computer
Client Setup
- Start NoMachine
- click on "Add"
- Fill in the details for your desired connection.
- For using our cloud server to connect to any computer you have access.
- Host = "nomachine.classe.cornell.edu"
- Protocol = "NX"
- For using lnx201 - our general use login node (not appropriate for CPU or memory-intensive applications)
- Host = "lnx201.classe.cornell.edu"
- Protocol = "SSH"
- For using your own CLASSE Public desktop or workstation
- Host = the hostname of your desktop or workstation. For example, "lnx1234.classe.cornell.edu"
- Protocol = "SSH"
- For using our cloud server to connect to any computer you have access.
- If Prompted, select "Password" authentication method, and click on "Continue"
- If you get a proxy checkbox, leave "Don't use a proxy" selected, and click "Continue."
- Change the connection name if desired, and click on "Done."
Connecting
- Start NoMachine, and double-click on the connection created above.
- The first time connecting, click "Yes" to accept the remote host certificate and verify its identity.
- Login with your CLASSE username and password.
- Double click on the computer you'd like to control.
- Click "OK" to accept the default Audio streaming setting (if desired).
Virtual Desktops
Depending on the version of nomachine installed on your computer, you may be able to create Virtual desktops in addition to controlling the physical display. To start a full XFCE virtual desktop:- start a connection to nomachine.classe.cornell.edu using either the NX or SSH protocols
- double-click on your desired computer
- click on the “New desktop” button (or double-click on “Create a new desktop or custom session”)
- double-click on “Create a new virtual desktop”
- Select desired display preferences. Good initial defaults might be “Show remote display at its resolution using scrollbars” and “Resize the remote display to match the client monitor” to should give you a nice full-screen display. Please see below for changing the display settings after starting a connection.
- start a connection to nomachine.classe.cornell.edu
- double-click on your desired computer
- right-click on the existing “virtual” session you see
- click on “Terminate”
Change connection settings (display, keyboard, etc.).
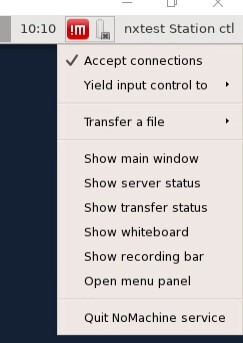
Once you've connected to your remote computer, enter the key combination Ctrl+Alt+0 to open the menu panel or:- move your cursor to the NoMachine icon in your taskbar and click on it.
- The NoMachine icon and menu:

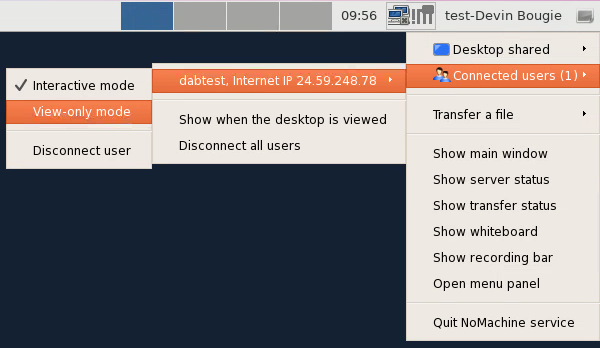
- The NoMachine icon and menu:
- Click on "Open menu panel" to open the menu panel of your current connection
Managing your computers
Please submit a ServiceRequest if you would like the ability to manage NoMachine connections on your desktop or workstation.Modifying list of trusted users
Unless a user is in your computer's list of trusted users, they won't be able to connect until someone already connected to the display allows their connection. Staff scientists are configurd as "NX Administrators" of their station computers, which allows them to maintain the list of trusted users. Login to your station computer, and in the following commands replace "classeid" with the remote user's classe username.- add a new trusted user :
sudo /usr/NX/bin/nxserver --useradd classeuser --trusted - delete a user :
sudo /usr/NX/bin/nxserver --userdel classeuser - remove trusted for a user :
sudo /usr/NX/bin/nxserver --useredit classeuser --trusted=none - view list of users :
sudo /usr/NX/bin/nxserver --userlist
Pausing Remote Access, switching between interactive and view-only, and Disconnecting Remote Users
To view current connections when logged in to a desktop, you can use the little NoMachine icon in the upper right on the top menu bar.- Hover over "Desktop shared" and click on "Desktop not shared" to disable desktop sharing.
- Hover over "Connected users" to see a list of connected users that you can disconnect change from view-only to interactive mode

- view list of current sessions :
sudo /usr/NX/bin/nxserver --list - view historical list of connections :
sudo/usr/NX/bin/nxserver --history - disconnect a user :
sudo /usr/NX/bin/nxserver --disconnect <username, session>(replace <username, session> with either the username or session id of the session you'd like to disconnect)
- Check if "Screen sharing" is disabled :
sudo /usr/NX/bin/nxserver --userlist - Enable "Screen sharing" for the physical display :
sudo /usr/NX/bin/nxserver --useredit station_account --screen-sharing yes(replacing "station_account" with the name of the user logged in to the physical display)
- stop accepting new connections :
sudo /usr/NX/bin/nxserver --stop - disconnect existing sessions as described above
- resume accepting new connections :
sudo /usr/NX/bin/nxserver --start
Edit | Attach | Print version | History: r21 < r20 < r19 < r18 | Backlinks | View wiki text | Edit wiki text | More topic actions
Topic revision: r21 - 05 Nov 2024, MichaelRoman
Quick Links
Usage Information
Collaboration
IT Communications
 Copyright © by the contributing authors. All material on this collaboration platform is the property of the contributing authors.
 Ideas, requests, problems regarding CLASSE Wiki? Send feedback


