Connecting to a Linux Machine from Windows
Recommended method for launching individual applications (CLASSE GRID script)
For simple access to Linux programs from Windows, we have created the CLASSE GRID script.Recommended methods for launching full virtual linux desktops (NoMachine or X2Go).
Both NoMachine and X2Go are supported methods of launching full virtual desktops. Please see connecting with the nomachine client and Creating a new desktop session, or launch a specific application with X2GoAlternate methods for launching a terminal or full desktop (XMing)
XMing should already be installed on all CLASSE Windows computers. (It has been included in all new CLASSE Windows computers from July 2008 on.) If it is missing from your computer, please contact the CLASSE computer group. Once XMing has been installed, you can follow these instructions:- Double Click the "RunXMing" shortcut on your desktop. PuTTY will open.
- On a non-CLASSE Windows system, you can download your own PuTTY executable (see here).
- Type in a computer name [1] (for example, LNX201). Click Open[2].
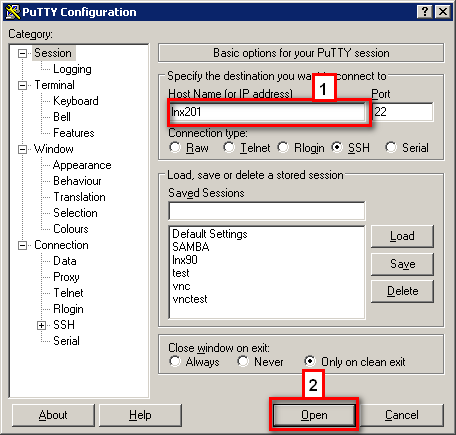
- LOTS of additional configuration details are available from the help button on the main screen. NOTE: Some information is very technical.
- You have a terminal open. If you want to run an X program, type the name (for example xclock) and press enter.
- You can open multiple terminals by Double Clicking on the desktop icon again. You will need to log in to the remote computer again however.
Manual Configuration
There are two ways to pre-configure XMing. Both use shortcuts or command line arguments.- To just configure the host to connect to with a shortcut, create a new shortcut and point it to the RunXMing executable. Add the host you want to connect to afterwards. The command line should be
RunXMing.exe computername - Alternatively, you can use PuTTY sessions. Start PuTTY (you can use the desktop shortcut RunXMing). Set any configuration you want using PuTTYs configuration window. Then go back to the first screen and name the session[1]. Then click on Save[2].
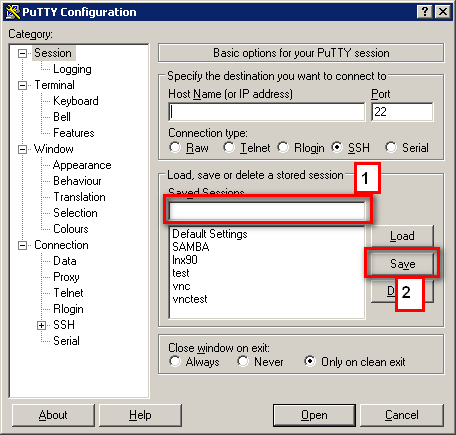
- You can then create a shortcut using the form:
RunXMing.exe -l puttysessionname
Troubleshooting
XMing Display fails when moved to another monitor in 2+ monitor configuration
Check the display color depth and ensure it is set the same for both monitors (we've tested with 32bit color).Using ICE, a Linux X Window manager (in a single X display window)
Sometimes it is more convenient to use a Linux X Window manager instead of the MS Windows multi-window manager. Although KDE and GNOME are popular, they can only be used on the display connected to the computer where they run. They make complex assumptions which cause problems when run from several remote displays simultaneously. In contrast, multiple copies of ICE can be run from several different X displays by the same person, connecting to the same computer at the same time.- If necessary, put a shortcut on your Windows Desktop which points to the program \\Program Filex\XMing\XLaunch.exe
- Use XLaunch to initate a single-window Xming session
- Double-click on the XLaunch icon
- Select its "One Window" option
- Optionally specify the Display number (0 is the default)
- Click on "Next" three times (accept the defaults for each step)
- Click on "Finish"
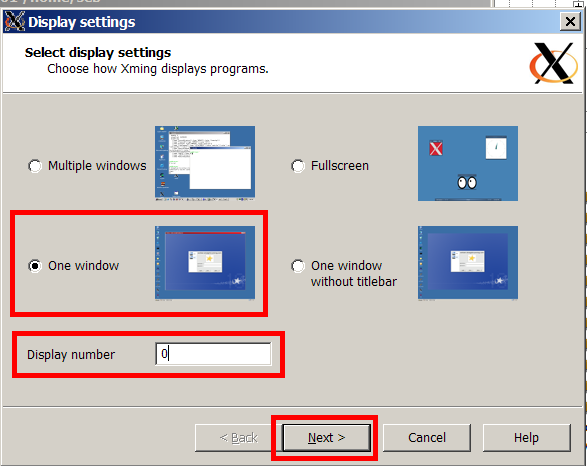
- A large black X display window will appear, occupying most of the screen
- Select the "Iconize to Taskbar" ( _ ) icon in its upper right corner.
- Use PuTTY to login on LNX201 (or some other Linux computer, if necessary)
- , Double-click on the PuTTY icon
- Expand the SSH entry
- Select the X11 entry
- Select "Enable X11 forwarding"
- Type "localhost:0.0" in the display location field
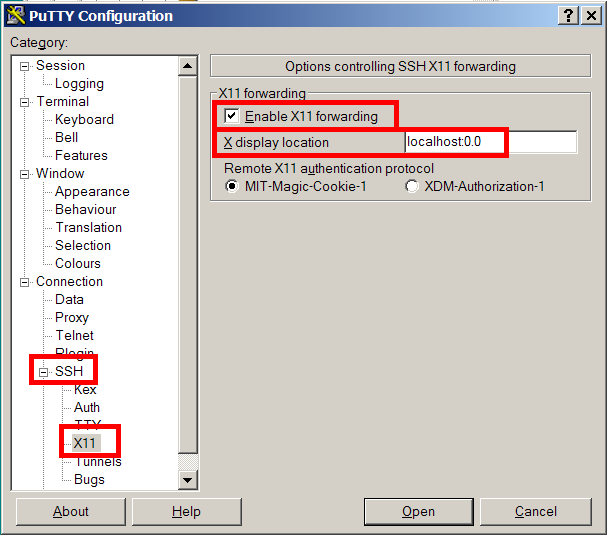
- Select the "Session" entry
- Type LNX201 in the Host field.
- Click on the Open button
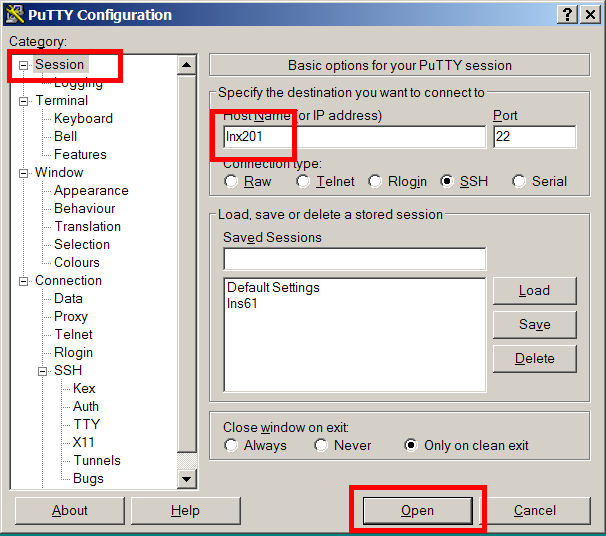
- Provide your Linux userid and password to login
- for most people, but not all, their Linux and CLASSE userids are the same as their NetIDs.
- , Double-click on the PuTTY icon
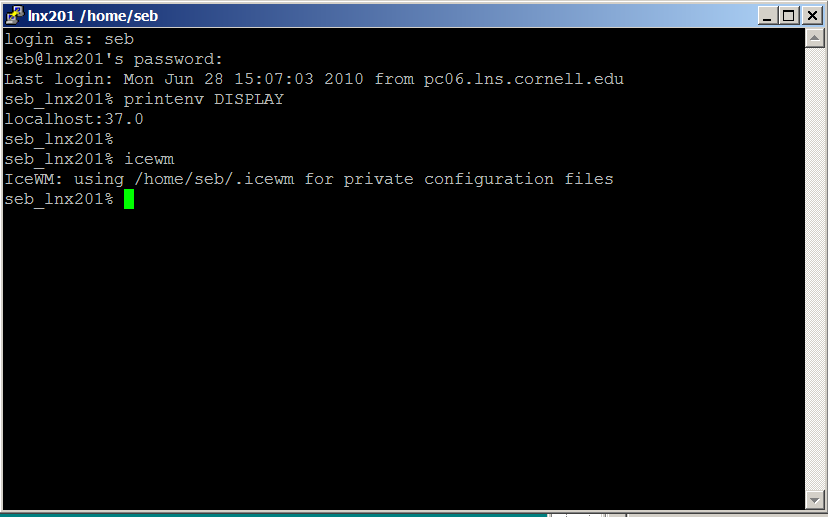
- Start icewm
- type the command "printenv DISPLAY" to verify that an SSH X display has been defined
- type the command "icewm" to start the ICE window manager
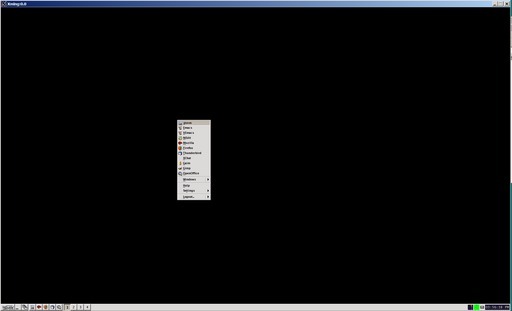
- expand the X display window and use Linux
Access from Windows to Central Filesystems
For a comprehensive list of available filesystems, please see https://www.classe.cornell.edu/private/computing/filesystems.html . To check if your file system is currently being backed up, see BackupSchedule. To request changes to this schedule, please open a ServiceRequest.Instructions
- For information about where you should be keeping your files, please see CLASSE's Data Stewardship information.
- From a non-CLASSE network (like RedRover) on a non-CLASSE managed computer, you first need to connect to our virtual private network (see ClasseVPN -- CLASSE login required).
- From a non-CLASSE system, you may need to replace samba below with samba.classe.cornell.edu. You will also need to tell your system to authenticate via the CLASSE domain.
- For Windows, you can do this by entering your username as
CLASSE\classeidinstead of justclasseid.
- For Windows, you can do this by entering your username as
- Many of our unix filesystems are available from Windows using our samba server. You can browse to these filesystems by typing
\\samba
into the address bar of any Windows Explorer window and then double clicking on a filesystem in the resulting list.- The list of filesystems and name translation is available here: https://www.classe.cornell.edu/private/computing/filesystems.html
- You can directly access to your Unix home directory (where files are stored by default for many Linux Applications) by typing
\\samba\home\YourLinuxUsername
into the address bar of any Windows Explorer window. Please be aware that there is a 1GB quota on your home disk.
Data Stewardship Video
This video discussing Data Stewardship under Windows at CLASSE is about 10 minutes long. https://wiki.classe.cornell.edu/pub/Computing/DataStewardship/Data_Stewardship.flv| I | Attachment | Action | Size | Date | Who | Comment |
|---|---|---|---|---|---|---|
| |
Accessing_Linux_From_Windows.flv | manage | 25 MB | 05 Aug 2013 - 15:09 | JamesPulver |
This topic: Computing > WebHome > WindowsSupport > ConnectingToALinuxMachineFromWindows
Topic revision: 05 Aug 2022, JamesPulver
Topic revision: 05 Aug 2022, JamesPulver
 Copyright © by the contributing authors. All material on this collaboration platform is the property of the contributing authors.
 Ideas, requests, problems regarding CLASSE Wiki? Send feedback

