|
|
You are here: CLASSE Wiki>EngineeringDesignDrafting Web>UserGuideANSYS>UsingRSM>WorkbenchANSYS (09 Oct 2018, db758)Edit Attach
-- DebasmitaBhattacharya - 13 Sep 2018
Workbench Solution-Process RSM Set Up
- Launch ANSYS (Workbench)
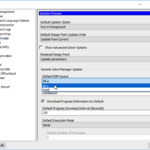
- Go to the top bar: Tools → Options
- In the pop up window: select Solution Process
- Change Default RSM Queue from Local to All.q
- Click OK to save
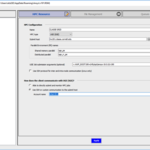
- Lauch RSM Configuration

- Go to the side bar and click Credentials
- Click the New Account icon. Log in using your netID and make a password.
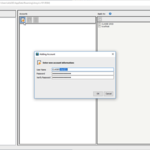
- Under Apply To, check the box in front of CLASSE GRID only. DO NOT click the box for local host.
- Click the New Account icon. Log in using your netID and make a password.
- Go to the side bar and click CLASSE GRID
- Go to HPC Resource Tab → find Account name and enter your netID
- Go to UGE Job submission section and replace ...ROOT190… with ROOT191
- Change the distributed parallel field to sge_rr_pe
- Click Apply
- Go to the File Management tab
- Edit the staging directory path from the client to include your netID: \\samba\tem\<netID>\ANSYSRSMTEST
- Edit staging directory path on cluster to also include your netID: /cdat/tem/<netID>/ANSYSRSMTEST
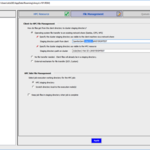
- Click on HPC staging directory under HPC Side File Management
- Click Apply
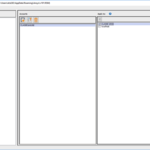
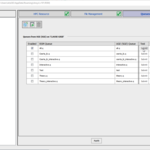
- Go to Queues tab
- Enable All.q (by checking only the box in front of All.q) and click Submit
- Wait for a green check under Status → then you're all set

- Back in the ANSYS Workbench
- In Tools → solve process settings
- Select My Computer, Background
- Select Make Default
- Click Advanced
- Change RSM Queue to All.q
- Click Apply
- In Tools → solve process settings


Edit | Attach | Print version | History: r3 < r2 < r1 | Backlinks | View wiki text | Edit wiki text | More topic actions
Topic revision: r3 - 09 Oct 2018, db758
- Drafting Links
- Public Drafting Pages
- Private Drafting Pages
- Webs
-
 ACC
ACC
- ACL
- Bunch
- CBB
- NSF
- CBETA
- CESR
- Private
- CHESS
- FMB
- Maia
- XIMG
- XLEAP
- CHEXS
- CLASSE
- Inventory
- CLEO
- CMSPhase2MREFC
- Computing
- Blogs
- Newsletter
- Cosmology
- DarkPhoton
- ERL
- EngineeringDesignDrafting
- G2
- HEP
- DBSWorkshop
- SWIG
- HLLHCCMSMREFC
- HMF
- HumanResources
- Private
- ILC
- Americas
- CesrTA
- Proposal
- DampingRings
- AreaLeaders
- CTA09
- ILCDR06
- ILCDR07_KEK
- ILCDR08
- S3TaskForce
- WWS
- MacCHESS
- Main
- People
- PhotocathodeBrightBeams
- REU
- SRF
- Safety
- Sandbox
- TestWeb
- System
- Theory
- Communications
- Documents
- Phase2MREFC
- WebDev
- XLEAP
Ideas, requests, problems regarding CLASSE Wiki? Send feedback