You are here: CLASSE Wiki>MacCHESS Web>BAM2FullCommandListing (05 Apr 2025, DavidSchuller)Edit Attach
-- DavidSchuller - 30 Mar 2023
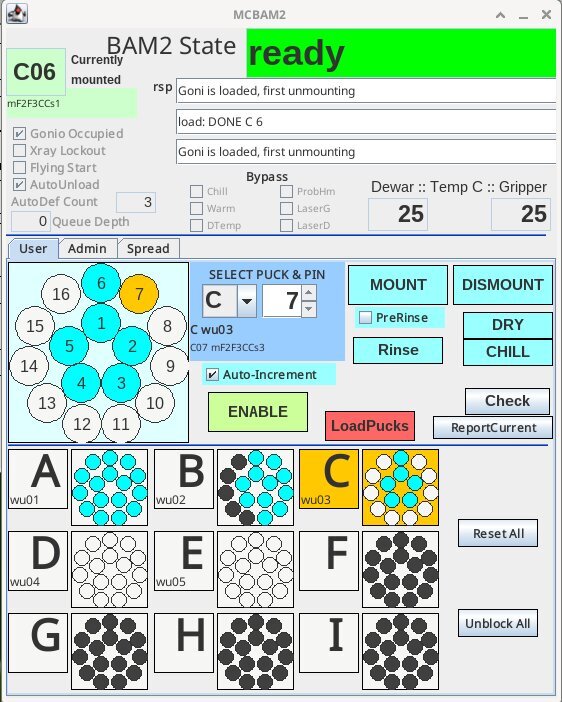
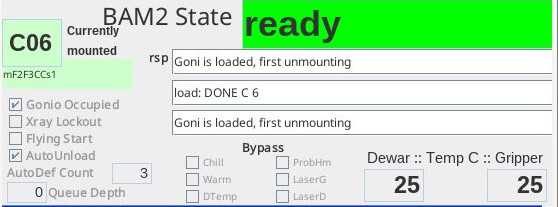 CAM2 State - Current status of the BAM-2, color-coded
Currently mounted - Which sample (puck and pin) is believed to be mounted on the goniometer. The user-supplied label is also displayed.
Check boxes:
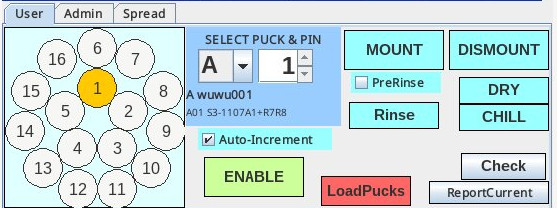 The USER panel contains the commonly used commands. Those used most often are highlighted in blue.
Selection puck - Represents the selected puck and allows selecting of a sample with a Left-Click. Color coding is similar to the Mount/Block panel: orange for the selected sample, gray for untouched, black for blocked, and cyan if the sample has been mounted at least once. Holding the mouse over a pin button displays the name of the sample.
Selecting a puck - Clicking the puck Combobox in the "SELECT PUCK & PIN" panel drops down the choices for puck, A - I. The name of the selected puck is then displayed beneath the ComboBox.
Selecting a pin - The pin can be selected with the pin spinner in the "SELECT PUCK & PIN" panel by clicking the tiny up and down arrows. Alternatively, the pin can be selected from the Selection puck at the left. They get updated together. The name of the selected pin is displayed below the spinner in the "SELECT PUCK & PIN" panel.
MOUNT - The selected sample will be picked from the dewar and mounted on the goniometer.
DISMOUNT - The currently mounted sample will be picked from the goniometer and returned to its position in the dewar.
RINSE - The currently mounted sample will be picked from the goniometer, dipped up and down in the liquid nitrogen, and returned to the goniometer. This is effective at removing surface frost from samples.
PreRinse - If your samples have a lot of surface frost, you can incorporate the RINSE motion into the mount command to save time over running the two commands separately.
DRY - The gripper will be run through the air knife defroster to remove the frost that builds up over time. This is done automatically every few samples by the AutoDefrost routine.
CHILL - The gripper will be pre-positioned in the liquid nitrogen to begin chilling. This can follow a DRY command. CHILL is not essential; the software knows enough to bring the gripper down to temperature before handling your samples. CHILL is for people who like to plan ahead.
ENABLE - Some minor errors (e.g. failure to MOUNT or DISMOUNT a sample) will put the interface in STANDBY mode, in which it is not processing commands off the command queue. Be sure to read the dialog messages which are displayed when this happens for clues as to the cause. The green ENABLE button returns the software state from STANDBY to READY. See BAM-2 STATE CONTROL for more details.
LoadPucks - This red button sends the gripper to a back corner and cuts power to the robot motors. See BAM-2 STATE CONTROL for more details. This command is for staff who load the pucks, it should be avoided by remote users. The only way to re-energize the BAM motors to continue operations is for someone to go in the hutch and push some buttons.
Check - Picks the selected sample from the dewar, takes it to the dewar-adjacent sensor and determines if the sample exists. If the answer is no, the position is blocked. This command is not used often.
ReportCurrent - Sends the identity of the currently mounted sample to the data collection software over a socket.
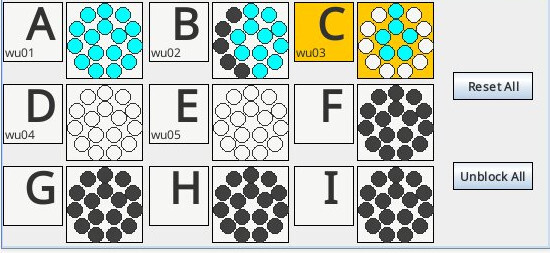
The Mount/Block panel occupies the lower portion of the User tab panel. A label and puck icon represents each puck. An instructional video on use of the MOUNT/Block panel is available. Pin buttons are color-coded:
Right-click* on the label pops up a menu with these choices:
Right-click* on any pin button pops up a menu with these choices:
Reset All - Reset mounted status of all pins in all pucks
Unblock All - Unblock all pins in all pucks
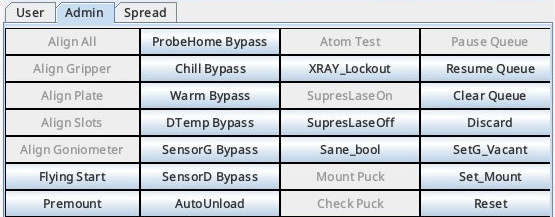 These commands are for staff, and should only be used if you have specific instructions. E.g. if a sensor is broken, you might be told to use a bypass feature to get you through the night.
Alignment features:
Align All - Calibrate position of gripper, then goniometer, then 3 posts on sample plate. This is the normal procedure after a user's pucks are loaded. Goniometer must be empty.
Align Gripper - Calibrate position of gripper vs. master reference post.
Align Plate - Calibrate position of gripper, then 3 posts on sample plate. Positions of individual puck slots are calculated from this info and previous mapping.
Align Slots - Calibrate position of gripper, then 3 posts on sample plate, then all 9 puck slots on sample plate. All slots must be empty.
Align Goniometer - Calibrate position of gripper, then of goniometer. Goniometer must be empty. Should be done after a table alignment or reset of the "Pin zero' position.
Flying Start - Special mode for when the gripper is so far out of alignment it cannot pick up the calibration probe. The gripper will move to the SafeFlip position (above the hole in the dewar lid), click closed and open twice, then wait 5 seconds for someone to manually place the probe snugly in the gripper. The gripper will close, then wait 3 seconds for the assistant to get out of the way before it continues with its next duties, which will always be to calibrate the gripper with probe against the master reference post.
After alignment, the gripper will return to the SafeFlip position, wait 5 seconds, then release the probe. Someone should catch it so it doesn't fall into the nitrogen.
The "FlyingStart" option may be toggled off after the probe is picked up, and in that case the probe will be returned to its cradle in the normal fashion. Premount - Send signal to data collection software to move goniometer to the standard position for automounter access (Phi=225, MX,MY,MZ=0). This is sent for all commands originating from the BAM-2. For commands originating from the data collection software, it is assumed the goniometer has been properly positioned in advance. Bypass features:
ProbeHome Bypass - Bypass the sensor which detects the calibration probe in its cradle. Useful when sensor is broken. Chill Bypass - Bypass temperature sensor in gripper while chilling. When gripper is placed in nitrogen, wait a certain period of time for gripper to chill instead. Useful when gripper temperature sensor is broken.
Warm Bypass - Bypass temperature sensor in gripper during defrost. Useful during development. DTemp Bypass - Bypass temperature sensor in sample dewar, return a cold temperature. In case the dewar temperature sensor breaks.
SensorG Bypass - Bypass the laser sensor which checks for presence of a sample on the goniometer. Useful if the sensor is broken or out of alignment.
SensorD Bypass - Bypass the laser sensor which checks for sample presence in the gripper adjacent to the dewar. Useful if sensor is broken or out of alignment. Has occasionally been useful if user has extremely rusty sample holders (shame on them). Assorted: AutoUnload - This toggle feature, on by default, affects behavior of the Mount button. If a sample is already mounted on the goniometer, it will be dismounted first; and then the selected sample will be mounted. Saves a few mouse clicks.
Atom Test - Bring up the AtomTest frame for advanced testing and development. Only for use by Dave Schuller or his successor once he is dead and cold in the ground. Further details below in a separate section.
XRAY_Lockout - The Xray Lockout mode is normally set by a signal from the data collection software (e.g. ADX) while data collection is in progress. When it is set, gripper access to the goniometer is denied. Mount, Dismount, Rinse and Align Goniometer commands will fail. This button allows the mode to be toggled in case the data collection software gets confused and forgets to unset it.
SPECIAL - Advanced command series, may change. Last used to mount each sample in each puck specified by a string in the System.properties file, wait 4 seconds, then dismount it. Puck drying cycle called after each puck. Last used for testing Hampton Research pins. SuppressLaserOn - block operation of laser sensors, which is normally done automatically when not in the READY mode. SuppressLaserOff - Allow laser sensors to operate. Sane_Bool - Restore state of all boolean features to default (all Bypass OFF, auto-unload ON, auto-increment ON, FlyingStart OFF, PreRinse OFF)
Mount Puck - Mount each unblocked sample of a puck, leave it on for 4 seconds, then dismount it. For endurance testing.
Check Puck - Pick up each sample of a puck, take it to SampleCheck position and test if sample is present in gripper, then return it to puck. Undetected samples will be assumed missing and blocked.
Pause Queue - Disable execution of new commands in queue. Current command will be finished, then state will transition to Standby.
Resume Queue - Resume execution of commands in queue. State transitions from Standby to Ready. Equivalent to Enable button on user command panel.
Clear Queue - Clear commands from the queue. The current command will be finished. DISCARD - Remove sample from goniometer, drop it in the special recovery spot in the dewar. SetG_Vacant - Without physically moving any sample, set the software to think that no sample is currently mounted. For correcting confusion if the BAM loses track of a sample. Set_Mount - Without physically moving any sample, set the software to think that the currently selected sample is the currently mounted sample. For correcting confusion of the BAM loses track of a sample.
Reset - Transition state to Standby mode with full startup configuration sequence.
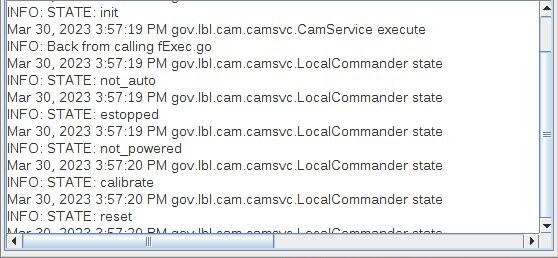
A text block showing a portion of the log file. This also gets written to ~/src/bam2/MacCam0.log. Perusing the log file can be useful if anything goes wrong, but it takes some study to know what to look for. For example, to see the results of calibrations, try searching the log file for SHIFT.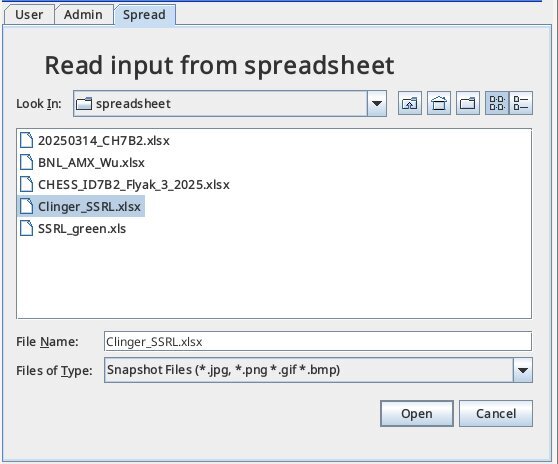 Each slot, A-I, has a ComboBox, with options appearing as a drop-down menu when the ComboBox is clicked.
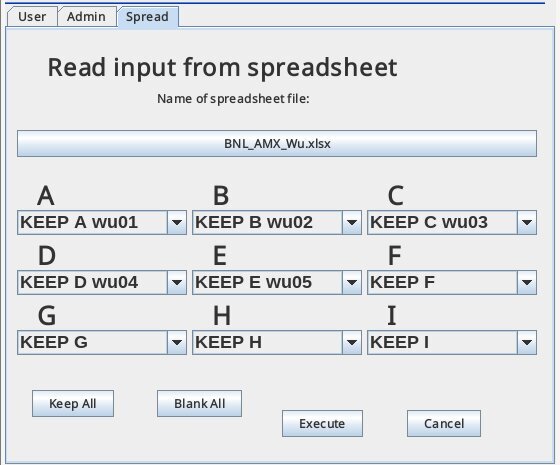 Each ComboBox offers these options:
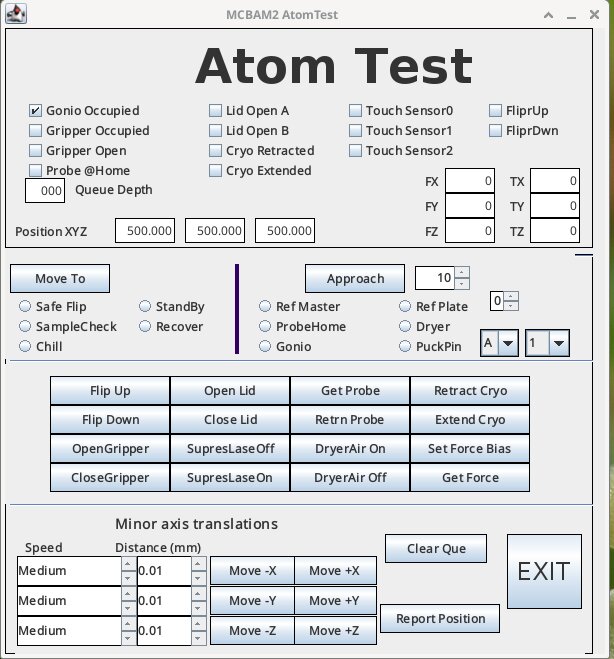
The Atom Test frame, called from one of the "Admin" buttons, is for serious development and testing. Most users will never see this feature.
 In the Unpowered state, the white button light will be off.
To transition from Unpowered to Standby state:
Full Listing of commands and features in the BAM-2 automounter interface
Similar information exists on the MacCHESS web site Software control of the BAM-2 automounter, but this wiki page is the most complete and up-to-date source of information on this topic. Panel by panelGeneral layout:
The interface features a status panel at the top. The lower section is tabbed between a User panel*, a *Admin panel and a ; *Spread panel*. The User panel is accompanied by the Mount/Block panel. The Admin panel is accompanied by a Log textbox. A separate AtomTest frame can be summoned from a button on the Admin panel.
Status panel:
 CAM2 State - Current status of the BAM-2, color-coded
 - RED - robot motors unpowered for safety. Robot control buttons in hutch must be pushed to recover from this state. See the section below on "BAM-2 State Control."
- YELLOW - Standby. Robot motors are powered, but software is not currently processing commands. Click "Enable" button to transition to Ready.
- GREEN - Ready. Robot motors powered and interface is processing commands.
Currently mounted - Which sample (puck and pin) is believed to be mounted on the goniometer. The user-supplied label is also displayed.
Check boxes:
- Gonio Occupied - Output from laser sensor aimed at sample base on the goniometer. Box should be checked only when a sample is mounted.
- Xray Lockout - Status of Xray_Lockout mode. See "Admin" section.
* Flying Start - Status of Flying Start toggle feature. See "Admin" section.
* AutoUnload - Status of AutoUnload toggle feature. See "Admin" section. On by default. * AutoDef Count - Auto Defrost counter. If the temperature indicates liquid nitrogen use, a DRY and CHILL command will be automatically queued by the MOUNT command when the count threshold is reached. The counter is incremented with every DISMOUNT or RINSE. The AutoDef threshold is set in the res/System.properties file. * Queue Depth - How many commands are queued up to be executed. See "Admin" section for Pause Queue, Clear Queue, Resume Queue commands. BYPASS features: * Chill - Status of Chill Bypass toggle feature. See "Admin" section.
Warm - Status of Warm Bypass toggle feature. See "Admin" section. * DTemp - Status of DTemp Bypass toggle feature. See "Admin" section. * SensorG - Status of SensorG Bypass toggle feature. See "Admin" section. SensorD - Status of SensorD Bypass toggle feature. See "Admin" section. * ProbHm - Status of ProbeHome Bypass toggle feature. See "Admin" section.
- Dewar
- Gripper
USER panel
 The USER panel contains the commonly used commands. Those used most often are highlighted in blue.
Selection puck - Represents the selected puck and allows selecting of a sample with a Left-Click. Color coding is similar to the Mount/Block panel: orange for the selected sample, gray for untouched, black for blocked, and cyan if the sample has been mounted at least once. Holding the mouse over a pin button displays the name of the sample.
Selecting a puck - Clicking the puck Combobox in the "SELECT PUCK & PIN" panel drops down the choices for puck, A - I. The name of the selected puck is then displayed beneath the ComboBox.
Selecting a pin - The pin can be selected with the pin spinner in the "SELECT PUCK & PIN" panel by clicking the tiny up and down arrows. Alternatively, the pin can be selected from the Selection puck at the left. They get updated together. The name of the selected pin is displayed below the spinner in the "SELECT PUCK & PIN" panel.
MOUNT - The selected sample will be picked from the dewar and mounted on the goniometer.
DISMOUNT - The currently mounted sample will be picked from the goniometer and returned to its position in the dewar.
RINSE - The currently mounted sample will be picked from the goniometer, dipped up and down in the liquid nitrogen, and returned to the goniometer. This is effective at removing surface frost from samples.
PreRinse - If your samples have a lot of surface frost, you can incorporate the RINSE motion into the mount command to save time over running the two commands separately.
DRY - The gripper will be run through the air knife defroster to remove the frost that builds up over time. This is done automatically every few samples by the AutoDefrost routine.
CHILL - The gripper will be pre-positioned in the liquid nitrogen to begin chilling. This can follow a DRY command. CHILL is not essential; the software knows enough to bring the gripper down to temperature before handling your samples. CHILL is for people who like to plan ahead.
ENABLE - Some minor errors (e.g. failure to MOUNT or DISMOUNT a sample) will put the interface in STANDBY mode, in which it is not processing commands off the command queue. Be sure to read the dialog messages which are displayed when this happens for clues as to the cause. The green ENABLE button returns the software state from STANDBY to READY. See BAM-2 STATE CONTROL for more details.
LoadPucks - This red button sends the gripper to a back corner and cuts power to the robot motors. See BAM-2 STATE CONTROL for more details. This command is for staff who load the pucks, it should be avoided by remote users. The only way to re-energize the BAM motors to continue operations is for someone to go in the hutch and push some buttons.
Check - Picks the selected sample from the dewar, takes it to the dewar-adjacent sensor and determines if the sample exists. If the answer is no, the position is blocked. This command is not used often.
ReportCurrent - Sends the identity of the currently mounted sample to the data collection software over a socket.
MOUNT/BLOCK status panel

The Mount/Block panel occupies the lower portion of the User tab panel. A label and puck icon represents each puck. An instructional video on use of the MOUNT/Block panel is available. Pin buttons are color-coded:
- Gray means the sample has not been mounted, but is eligible.
- Cyan means a sample has been mounted at least once, and is eligible.
- Black means a sample is blocked and therefore not eligible for mounting. Blocking a sample means that it will fail faster if a mount is attempted.
Right-click* on the label pops up a menu with these choices:
- Select puck - Make this puck the selected puck. Alternative to the Puck select ComboBox.
- Reset puck - Clear mounted status of all pins in this puck.
- Block puck - Block all pins in this puck so they cannot be mounted.
- Unblock puck - Unblock all pins in this puck so they can be mounted.
- Rename puck
Right-click* on any pin button pops up a menu with these choices:
- Select pin - Make this sample the selected puck & pin. Alternative to Puck select Combobox and Pin select Spinner.
- Reset pin - Clear mounted status of this sample pin.
- Block pin - Block this sample pin so it may not be mounted.
- Unblock pin - Unblock this sample pin so it may be mounted.
Reset All - Reset mounted status of all pins in all pucks
Unblock All - Unblock all pins in all pucks
ADMIN command panel
 These commands are for staff, and should only be used if you have specific instructions. E.g. if a sensor is broken, you might be told to use a bypass feature to get you through the night.
Alignment features:
These commands are for staff, and should only be used if you have specific instructions. E.g. if a sensor is broken, you might be told to use a bypass feature to get you through the night.
Alignment features:Align All - Calibrate position of gripper, then goniometer, then 3 posts on sample plate. This is the normal procedure after a user's pucks are loaded. Goniometer must be empty.
Align Gripper - Calibrate position of gripper vs. master reference post.
Align Plate - Calibrate position of gripper, then 3 posts on sample plate. Positions of individual puck slots are calculated from this info and previous mapping.
Align Slots - Calibrate position of gripper, then 3 posts on sample plate, then all 9 puck slots on sample plate. All slots must be empty.
Align Goniometer - Calibrate position of gripper, then of goniometer. Goniometer must be empty. Should be done after a table alignment or reset of the "Pin zero' position.
Flying Start - Special mode for when the gripper is so far out of alignment it cannot pick up the calibration probe. The gripper will move to the SafeFlip position (above the hole in the dewar lid), click closed and open twice, then wait 5 seconds for someone to manually place the probe snugly in the gripper. The gripper will close, then wait 3 seconds for the assistant to get out of the way before it continues with its next duties, which will always be to calibrate the gripper with probe against the master reference post.
After alignment, the gripper will return to the SafeFlip position, wait 5 seconds, then release the probe. Someone should catch it so it doesn't fall into the nitrogen.
The "FlyingStart" option may be toggled off after the probe is picked up, and in that case the probe will be returned to its cradle in the normal fashion. Premount - Send signal to data collection software to move goniometer to the standard position for automounter access (Phi=225, MX,MY,MZ=0). This is sent for all commands originating from the BAM-2. For commands originating from the data collection software, it is assumed the goniometer has been properly positioned in advance. Bypass features:
ProbeHome Bypass - Bypass the sensor which detects the calibration probe in its cradle. Useful when sensor is broken. Chill Bypass - Bypass temperature sensor in gripper while chilling. When gripper is placed in nitrogen, wait a certain period of time for gripper to chill instead. Useful when gripper temperature sensor is broken.
Warm Bypass - Bypass temperature sensor in gripper during defrost. Useful during development. DTemp Bypass - Bypass temperature sensor in sample dewar, return a cold temperature. In case the dewar temperature sensor breaks.
SensorG Bypass - Bypass the laser sensor which checks for presence of a sample on the goniometer. Useful if the sensor is broken or out of alignment.
SensorD Bypass - Bypass the laser sensor which checks for sample presence in the gripper adjacent to the dewar. Useful if sensor is broken or out of alignment. Has occasionally been useful if user has extremely rusty sample holders (shame on them). Assorted: AutoUnload - This toggle feature, on by default, affects behavior of the Mount button. If a sample is already mounted on the goniometer, it will be dismounted first; and then the selected sample will be mounted. Saves a few mouse clicks.
Atom Test - Bring up the AtomTest frame for advanced testing and development. Only for use by Dave Schuller or his successor once he is dead and cold in the ground. Further details below in a separate section.
XRAY_Lockout - The Xray Lockout mode is normally set by a signal from the data collection software (e.g. ADX) while data collection is in progress. When it is set, gripper access to the goniometer is denied. Mount, Dismount, Rinse and Align Goniometer commands will fail. This button allows the mode to be toggled in case the data collection software gets confused and forgets to unset it.
SPECIAL - Advanced command series, may change. Last used to mount each sample in each puck specified by a string in the System.properties file, wait 4 seconds, then dismount it. Puck drying cycle called after each puck. Last used for testing Hampton Research pins. SuppressLaserOn - block operation of laser sensors, which is normally done automatically when not in the READY mode. SuppressLaserOff - Allow laser sensors to operate. Sane_Bool - Restore state of all boolean features to default (all Bypass OFF, auto-unload ON, auto-increment ON, FlyingStart OFF, PreRinse OFF)
Mount Puck - Mount each unblocked sample of a puck, leave it on for 4 seconds, then dismount it. For endurance testing.
Check Puck - Pick up each sample of a puck, take it to SampleCheck position and test if sample is present in gripper, then return it to puck. Undetected samples will be assumed missing and blocked.
Pause Queue - Disable execution of new commands in queue. Current command will be finished, then state will transition to Standby.
Resume Queue - Resume execution of commands in queue. State transitions from Standby to Ready. Equivalent to Enable button on user command panel.
Clear Queue - Clear commands from the queue. The current command will be finished. DISCARD - Remove sample from goniometer, drop it in the special recovery spot in the dewar. SetG_Vacant - Without physically moving any sample, set the software to think that no sample is currently mounted. For correcting confusion if the BAM loses track of a sample. Set_Mount - Without physically moving any sample, set the software to think that the currently selected sample is the currently mounted sample. For correcting confusion of the BAM loses track of a sample.
Reset - Transition state to Standby mode with full startup configuration sequence.
LOG panel

A text block showing a portion of the log file. This also gets written to ~/src/bam2/MacCam0.log. Perusing the log file can be useful if anything goes wrong, but it takes some study to know what to look for. For example, to see the results of calibrations, try searching the log file for SHIFT.
SPREAD panel
The Spreadsheet panel is for importing info with names of pucks and samples from a user-supplied spreadsheet. The spreadsheet should be in Excel file format .xls or .xlsx. A template is available. An instruction video for use of the Spreadsheet panel is available. A wide button at the top allows specification of the spreadsheet file with a file chooser. The chooser points by default to a directory specified in the config file res/System.properties. When this file is opened, the spreadsheet data is read and parsed, and options added to the ComboBoxes for each puck slot. Each slot, A-I, has a ComboBox, with options appearing as a drop-down menu when the ComboBox is clicked.
 Each ComboBox offers these options:
 - KEEP - Keep the existing data for this puck slot.
- BLANK - Clear out info for this puck slot.
- A list of pucks parsed from the spreadsheet file. Buttons at the bottom are:
Atom Test frame
The Atom Test frame, called from one of the "Admin" buttons, is for serious development and testing. Most users will never see this feature.

AtomTest status panel
Status check boxes provide output from the various sensors and micro-switches:- Gonio Occupied (laser sensor output at goniometer)
- Gripper Occupied (laser sensor output at SampleCheck position)
- Gripper Open
- Probe@Home (calibration probe is in its cradle)
- Lid Open A The two halves of the pneumatic lid have separate sensors.
- Lid Open B
- Cryo Retracted cryostream mount has pneumatic lift to retract it while gripper accesses goniometer.
- Cryo Extended
- Touch Sensor0 - discrete level, lowest force. Used for calibration.
- Touch Sensor1 - discrete level, intermediate force.
- Touch Sensor2 - discrete level, high force. There is a fourth, even higher, discrete output from the force sensor which triggers an interrupt to unpower the robot motors if excessive force is encountered.
- FliprUp position of pneumatic 90d rotation stage for gripper. Up for access to goniometer, down for access of dewar.
- FliprDwn
AtomTest commands
Move to/Approach defined positions. Positions are defined in the properties files in the /res directory. Move To - move to position selected by radio buttons:- Safe Flip - where the gripper goes to flip up and down
- SampleCheck - Dewar-adjacent position where samples are held up for sensor check
- Chill - Gripper is down through hole in lid, in nitrogen
- Standby - Gripper is back out of the way to the left, best for loading pucks
- Recover - the special spot in the dewar where samples are dropped when they cannot be put back in the puck.
- Reference Master alignment post
- ProbeHome - Where the alignment probe is kept
- Gonio
- Reference post on sample plate (0-2)
- Dryer
- Puck/Pin (select A-I, 1-16)
Discrete commands
- Flip Up
- Flip Down
- OpenGripper
- CloseGripper
- Open Lid
- Close Lid
- SuppressLaserOff - Allow the laser sensors to operate. This is normally done automatically when the READY mode is entered.
- SuppressLaserOn - Suppress operation of the laser sensors. This is normally done automatically when the STANDBY or Unpowered states are entered.
- Get Probe
- Retrn Probe
- DryerAir On
- DryerAir Off
- Retract Cryo - Engage pneumatic lift for cryostream
- Extend Cryo - Release pneumatic lift of cryostream
- Set Force Bias - zero out Force/Torque readings
- Get Force - Get immediate reading from the Force/Torque sensor. A reading is also made after each move.
Minor axis translations
(For each axis) Speed(select with spinner), Distance(mm)(select with spinner), Move-, Move+ +X is to the North. +Y is upstream to the Xrays. +Z is gravitational up.Assorted
Clear Que - clear AtomTest command queue. This is separate from the general BAM-2 command queue. Report Position - Write current position to the log file so it can be easily identified. Exit - Close the AtomTest frame. I recommend moving the gripper back to StandBy position first.Command times
In seconds. Based on 2023-1 run. For sample-handling commands, shorter times will reflect that gripper is pre-chilled. Longer times may include retries. Longer mount times may include pre-rinse. Longer dismount times may include dry-chill cycle time in case of initial failure.- Operation: Median (range)
- Rinse: 62.5 (55.0 - 79.2)
- Mount: 44.6 (24.5 - 99.1)
- Dismount: 46.6 (35.2 - 216.9)
- Dry: 54.9 (13.95 - 68.7)
- Chill: 52.0 (11.3 - 65.8)
- Align Gripper: 59.4 (56.2 - 85.037)
- Align Goniometer: 106.2 (102.8 - 118.2)
- Align Plate: (176.6 - 196.4)
- Align All (Gripper, Gonio, Plate): 233.4 (221.9 - 250.2)
- Align Slots: (615.5 - 629.7)
BAM-2 State Control
The BAM-2 interface uses SCXML state control markup language to ensure that the automounter is always in a defined state. Part of state control is managing the power to the robot control motors, which is done for safety reasons. If someone is loading pucks or performing maintenance in the vicinity of the automounter, they need to be sure that they are safe from unexpected robot motion. To accomplish this, the BAM-2 robot can be put into an Unpowered state.Unpowered state:
When the BAM-2 is in the Unpowered state, the State line in the status panel at the top of the BAM-2 GUI turns red and says "unpowered". When the motors are unpowered, the robot arm may be manually pushed around in horizontal directions. Be sure that the arm position is well within its legal range before transitioning from unpowered mode to standby mode, otherwise the software will hang. Any of three things will cause the robot to enter the unpowered state:- Clicking the LoadPucks button on the User command panel
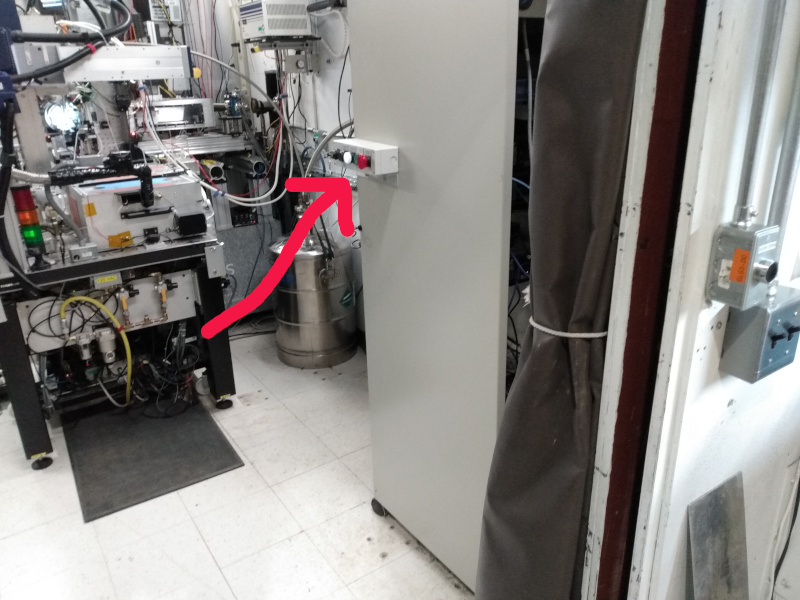
- Stepping on the pneumatic safety mat on the floor near the automounter (visible in photo below)
- The Force/Torque sensor through which the gripper is mounted to the robot arm registering an excessive force

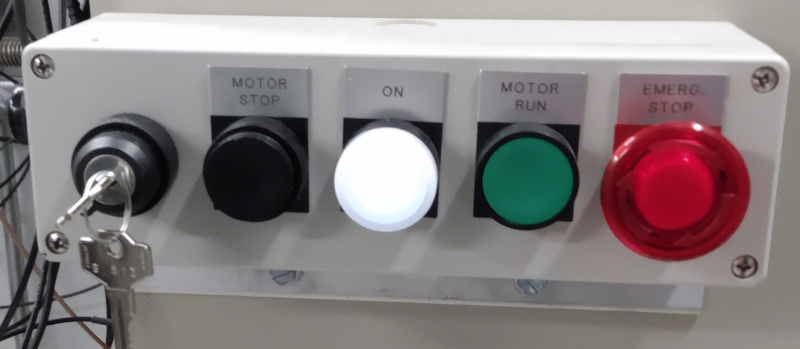
 In the Unpowered state, the white button light will be off.
To transition from Unpowered to Standby state:
 - Hit the green button, and the white button light should start blinking.
- Hit the white button. The BAM-2 interface will transition to Standby mode and the white button light should glow steadily.
Standby state:
In the Standby state, the GUI State bar will be yellow and read "Standby." The robot motors are powered up, but the software interface is still not processing commands. To accomplish this, hit the Enable button on the User command panel to transition to Ready mode.Ready state:
In the Ready mode, the GUI status panel state bar will be green, the robot motors are powered, and the software will accept and execute commands. The state bar text will be either "Ready" or whatever command it is executing. To transition back to the Standby mode, hit the Pause Queue or Reset buttons on the Admin command panel of the GUI.Things Not Seen
Command Queue
The BAM-2 interface software has a command queue. The count of queued-up commands appears in the Status panel. In general, commands requesting action (MOUNT, DRY, etc.) are queued up and executed in order, while commands setting modes (BYPASS toggles, AutoUnload, FlyingStart, etc.) are executed immediately. Command buttons on the Admin panel related to the command queue include PauseQueue, ClearQueueConfiguration files
A number of configuration files are located In directory res. The main configuration file, System.properties, contains a variety of things: IP and port addresses for sockets and HTTP service, discrete input and output addresses, the list of angles for AlignGoniometer, the AutoDefrost threshold, locations for important positions (defroster, SafeFlip, SampleCheck). Two separate files, Cold.properties and Warm.properties, are maintained with positions of the gripper, the goniometer, the sample plate reference posts and the puck slots. cam.xml contains the SCXML state definitions.Database
An HSQML database runs for the benefit of the BAM-2 interface. The relevant files are found in res/database. Stored information includes puck names, sample names, mount count, blocked status of all samples; state of most Boolean features including all BYPASS features, FlyingStart, PreRinse, AutoUnload, AutoIncrement, identity of the currently mounted sample and the currently selected sample.HTTP Server
The BAM-2 interface includes an HTTP server. The address and approved HTTP client list is in the System.properties file. Currently allowed requests are for information, not action. Allowed requests are for: STATE - return text of the state string XML - returns an XML block with names, mount count and blocked status for all pucks and samples CURRENTSAMPLE - the sample currently mounted on the goniometer SELECTEDSAMPLE - The sample currently selected in the interface
Edit | Attach | Print version | History: r10 < r9 < r8 < r7 | Backlinks | View wiki text | Edit wiki text | More topic actions
Topic revision: r10 - 05 Apr 2025, DavidSchuller
- Webs
-
 ACC
ACC
-
 ACL
ACL
-
 Bunch
Bunch
-
 CBB
CBB
-
 NSF
NSF
-
 CBETA
CBETA
-
 CESR
CESR
-
 Private
-
 CHESS
CHESS
-
 FMB
FMB
-
 Maia
Maia
-
 XIMG
XIMG
-
 XLEAP
XLEAP
-
 CHEXS
CHEXS
-
 CLASSE
-
 Inventory
-
 CLEO
CLEO
-
 CMSPhase2MREFC
-
 Computing
-
 Blogs
Blogs
-
 Newsletter
-
 Cosmology
-
 DarkPhoton
-
 ERL
ERL
-
 EngineeringDesignDrafting
-
 G2
G2
-
 HEP
HEP
-
 DBSWorkshop
-
 SWIG
SWIG
-
 HLLHCCMSMREFC
-
 HMF
HMF
-
 HumanResources
-
 Private
-
 ILC
ILC
-
 Americas
-
 CesrTA
-
 Proposal
-
 DampingRings
-
 AreaLeaders
-
 CTA09
CTA09
-
 ILCDR06
-
 ILCDR07_KEK
-
 ILCDR08
-
 S3TaskForce
-
 WWS
WWS
-
 MacCHESS
-
 Main
Main
-
 People
-
 PhotocathodeBrightBeams
-
 REU
REU
-
 SRF
SRF
-
 Safety
-
 Sandbox
-
 TestWeb
-
 System
-
 Theory
-
 Communications
-
 Documents
-
 Phase2MREFC
-
 WebDev
-
 XLEAP
XLEAP
 Copyright © by the contributing authors. All material on this collaboration platform is the property of the contributing authors.
 Ideas, requests, problems regarding CLASSE Wiki? Send feedback
